I did it! I got everything structural done on the inside of the trailer that I wanted to before we take it on a trip.
That started with finishing the far side bench. OK, I'm fudging a bit on being done. That back bench brace is just not right, but now I know why. I was using the brace that was factory installed as my guide for the line to continue. Mid afternoon, I was sitting in the trailer just looking at things. Sometimes that's how I solve problems- I probably spend way more time sitting and studying the situation than most people would think necessary. But it has saved me some real goofs, and has given me some solutions to tricky difficulties.
Anyway. I was sitting on the door side bench. I laid a level across it. Near perfect. I laid the level across the table (bed center section). Same. I laid the level across the far bench. Problem. So that bench has been sitting on a fairly severe angle for 34 years. I'll have to cut out all those supports and re-fiberglass them in at the right places. That wasn't happening today. I figured it could wait a little longer since it's been crooked but usable for those 34 years. So I left the old bench seat on that side, and just cut the extra piece. Put all that together.

Then I cut out that second wall piece just like the one I did yesterday. While the paneling and the plywood were still clamped together (right sides together) I set it in place for a dry fit. Again, it looked really stupid laid out on the paneling, but I made the front edge straight with one of the lines, and you'll see that it looks good. Actually, this was pretty tricky and took forever. I made a full cardboard template, using a plumbline to get the front edge straight and the back edge matched up to the curve of the wall.

Waited until almost 8 pm, so the glue could set up, then screwed it in place.
Meanwhile, I started having some fun. I put the old grubby carpeting back in (trimming to fit in front of the benches and around the new walls) just so there will be a floor cover for our trip. Vacuumed and put in the old cushions.
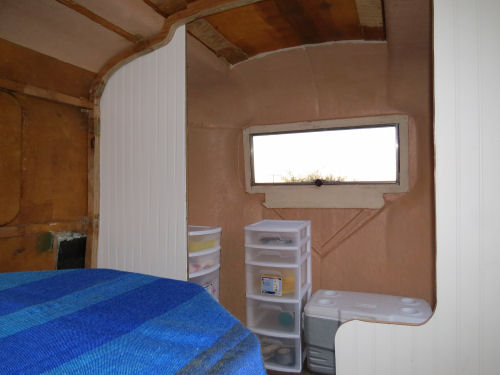
Put the storage tubs and the cooler in. They drawer units need securing, but I wanted to play! The tablecloth is superfluous, but it looks nicer than the old cracked table. Eventually, the wood sides of these walls will be sanded and polyurethaned.

Here's the view on the white side of the walls while siting on a bench.
I confess, I got a little choked up, sitting there, realizing it's really going to happen. Said a little prayer of thanks that I'm being allowed to do this, and that so far it's turning out as nice as I dreamed up.
Stopped playing when it got too dark to see.
I won't show you the little temporary tweaks every day between now and Friday, but I'll do a final "reveal" of what it looks like when I'm ready to roll. And I shouldn't need to spend all afternoon, every day, getting those accomplished. I have other things to do to get ready!
Tomorrow, I have a vendor event, so I'll be tired in a different way tomorrow. Today, I'm beat again, but I'm so energized about the trailer I hope I can sleep.
 | See Water and Wall 1 |
| if you like this blog, click
| |
2 comments:
You made a lot of progress. It really is all coming together now.
Good luck at the vendor event
That looks so different from the first that I saw it. You are working marvelous wonders, Sharkey.
Post a Comment