Entries to Win Afghan

Sign up to receive the Books Leaving Footprints Newsletter. Comes out occasionally. No spam. No list swapping. Just email me! jhyshark@gmail.com Previous gifts include a short story, a poem, and coupons. Add your name, and don't miss out!
Showing posts with label trailer refurbish. Show all posts

Saturday, November 25, 2023

My Little Sausage


Sunny is all trussed up like a sausage for the winter before we start getting snow. Perhaps the first significant fall tonight and tomorrow. I had to go buy some new rope, but the cover is in good condition.

So, yes this means I'm not taking the trailer on my January trip. And yes, this means that Marie is not going with me. Her back is giving her fits, and she can't ride that far. This will be a trip to see people that are more in my world than hers; she was just going to go for the fun of it. But it won't be fun at all if she can't move. I'm sorry she can't go, but it's OK.
travel trailer covered for winter


I kept puttering at finishing the last of the repair jobs over the last week or so. The light switch is properly mounted in the box, although it's not flush. Maybe I can improve that another time, but for now, it's OK.
trailer light switch


I mounted a paper towel holder under the kitchen cupboard.
paper towel holder in trailer


And, Sue had created a little shelf for the corner under the counter, but it always tipped backwards. I think I've now got that fixed. But it's a rough job. If this works, we'll call this a template for a nice shelf. It's very handy and was a great idea.
corner shelf in a small trailer


In other news: the kitchen floor is almost cleared. I put everything back in the trailer that won't matter if it freezes, but that leaves me a lot of stuff to keep in the house. I'm not sure where all that is going to go. There's just so much to do. I did client work in the morning, and worked on putting the trailer to bed and cleanup all afternoon. I'm whipped.

See Trailer Repairs

Thursday, November 16, 2023

Trailer Repairs - 1D, 2B, 3A - Several Things


The upper kitchen cupboard should now stay where it belongs, and have adequate support. The trim strip that is above the window is now doubled up so that the back edge of the cupboard rests on it. The only issues with this fix were finding the same kind of molding (not stored with all the others at the store, and it took me two trips to find it), and buying some additional screws because the extra layer then added 1/4 inch to the distance to reach wood.
trim strip inside a small trailer


Cathy came over and we got the last piece of foam insulation in place. That was definitely a two-person job just because of the size of the flappy thing.

Then I was able to replace the vent trim.

And I worked on getting the new, dimmable light installed. The wiring diagram that came with it was wonky, so I had an electrician friend tell me what I should actually do. Of course the wires on the fixture were too short, so I had to extend all of those by a few inches to have enough to work with. It took forever to find several of the items I needed to make this happen. OK, not forever, but it seems like I spend more time walking back and forth to the house than it takes to actually fix the item.

You can see that it is lit up, and the dimmer switch does work properly. However, by then it was nearly 5 pm, and my neck was stiff from working at the funky angle. The wires were being a pill to get stuffed back up out of the way, so I decided to finish this another day.
ceiling insulation in a small trailer


And, I had clothes on the line. It was warm and windy, so I got one more outside drying day, and I had to get those taken in.

The other trailer project that is now finished was to replace the electric port on the back. I don't know why I didn't do this as part of the initial project. The plastic was old and brittle, and the door broke off sometime during this last year. Here's the hole with the old port removed.
port hole for trailer electric service


The new one fits the hole just fine, but the flange is larger, so I had to drill new holes. Actually, I'm glad it's larger because that way you can't tell that I didn't remove this before I painted. Funny story about putting in the pop rivets. A number of years ago, I bought a nice pop rivet tool because our old one was a piece of crap. However, the new one seems to be made for someone with monster hands. I was unable to get my hand to span the two handles and squeeze them to install the new rivets. Cathy and I did it together and were able to squeeze them enough until the rivets popped. I had exactly three rivets of the size I needed. So I dodged yet another trip to the store, for now.
trailer port for electric


It was a glorious day! The morning started with the "red sky, sailor take warning." The forecast says we may get some rain tonight, but it's hard to believe how lovely it was for mid-November.
red sunrise


I didn't get all the stuff on the porch put away because I spent so much time on the trailer, but I did do the most annoying one- had to take everything out of the car to put the jumper cables away.

Every time I am able to work on projects long into November, I am reminded of the year when I took out the entire wall of our enclosed porch on the old house and rebuilt it in November- some year- maybe around 1980? Maybe earlier. We might not have had the boys yet. Doesn't matter.

I also did work for a client in the morning and the load of laundry. No writing happened, but I needed to take advantage of the nice day to do these jobs.

See Insulation

Monday, October 30, 2023

Trailer Repairs - 1C - Insulation


The trailer insulation is ready to have the final interior layer put back on. I will have help with that later this week. I finished this in small work sessions throughout the day so that the fumes weren't too bad. A couple of mistakes were made, but if the ceiling stays up this time, I'll take it.
insulating a fiberglass trailer


The temperature was chilly today, but the sunlight was most welcome. Here's another mood of my backyard.
october scene with clouds and shadows


The gazania in the front flower bed just isn't ready to give up for winter. This is not quite open, and there is another bud. I covered it for the night. We'll see if it survives to open.
gazania opening


I edited. I paid bills. I put some garden stuff away. Maybe the first snow tomorrow.

See Insulation 1B
See Moods of My Backyard

Sunday, October 29, 2023

Trailer Repairs - 1B - Insulation


Some days it feels just normal to go work on the trailer in the afternoon, and some days it's just a drag. Well, today was one of the latter, but the insulation is close to being ready for the finish layer to be put back in place.

Here's what it looked like yesterday, after completing the scraping and cleaning of old glue off the ceiling.
insulating a fiberglass trailer


Today I learned that although the spray glue has almost no odor when I can keep the door open, when it's cold enough to need to work inside with a little heat on to make the glue a happy temperature, the fumes can get a little bad. Thus, I didn't quite finish. I had to give up and let it all air out a bit. That center section has to have a double layer, so there's a little more to do than what might be apparent, but I'm close.
insulating a fiberglass trailer


I also checked out how easy/hard it is going to be to mount the new light fixture. I decided to change it while I had everything apart. What I had was an LED light that was really bright. I liked it a lot, but it wasn't dimmable, and some of my helpers had trouble with that. So, now I have a dimmable one, and it will actually be easier to install than the previous one.

The big news of the day is that I couldn't sleep again last night. But I know exactly why. I finally got a brainstorm for the details of the plot line in Vacation from Dead Mule Swamp.

Have you ever had a brainstorm? If so, you know why they are called that. The neurons in my brain just fire off so fast and continuously I'm like in hyper-drive. I can even physically feel it- almost like my brain is pulsing. I did speech to text in Google Docs, and managed to get most of my ideas preserved. I've learned that when things are coming to me so fast and furiously I'll never remember them all if I don't make notes. Now I know exactly what additional research I need to do. I wrote the next scene and started a Chapter List. I don't really do outlines, but I sort of block out what might happen in each chapter. This helps me see if I have enough/too much material, good flow, story arc, etc.

The books don't always happen this way. The Hollow Tree at Dead Mule Swamp did. The idea came to me and I wrote the whole thing in a weekend. OK, it's only 15,000 words, but boom- there it was in my head. Dead Mule Swamp Mistletoe was essentially written on a 12-hour drive home from Alabama. That also got recorded in Docs as I drove. I worked out all those crazy relationships- how so many people hated each other and why. It still took me several months to actually write it, but I didn't have to agonize over what was going to happen next. The rest of the series basically came one chapter at a time, as a slog, with only a rough idea of the ending. In one of them, I even changed my mind about who the guilty party was about half-way through.

I also edited.

See 1A - Insulation

Monday, October 23, 2023

Trailer Repairs - More Adhesive Product Education


I spent 3 hours on the trailer today and have very little to show for it. Except that some new pieces of information are now located in my brain.

Maybe I should have known this one, but if I did, I had forgotten. The shelf life of fiberglass resin hardener is only 6-8 months. It's the stuff in the little squeeze tube. You put in one drop of this to every 0.1 ounce of the resin, then mix and use it to bond the fiberglass cloth to the surface. Only, if the hardener is old... it never hardens. My two little braces were lying on the countertop in a sticky mess of unhardened resin this morning. Solution... new hardener. Those are now attached yet again. Hopefully, tomorrow they will be tight and dry.
fiberglass resin kit


The next bit of adhesive information involves removal. The Loc-tite Ultra peels off the fiberglass easily. However, there are two strips of wood running the length of the trailer that the previous owner added to hold various things, and I left them in place because they were useful to me as well. Loc-tite sticks to wood very well. Some of the stringy blobs of adhesive peeled off pretty well, but most did not. Scraping them off wasn't very satisfactory either. It left a bumpy film that wasn't going to be a good surface for gluing to.

I looked up how to remove Loc-tite. This is one solution, and it worked well for me. Blast it with a heat gun and scrape it while it's hot. I couldn't hold both the heat gun and the scraper and take a picture, but you get the idea.
removing glue with heat gun


This got most of it off, and then I wiped the final residue with acetone, and that got it clean and smooth enough to glue to again.

However, I learned another thing about working with the polyethylene foam. You don't want to let the direct heat of the heat gun hit it! See how it shrank? This location doesn't matter, so I'm glad I learned that lesson where it makes no difference. That arc of damage is from waving the heat gun at it. I'll be sure to remove the rest of the glue residue before I have polyethylene foam anywhere near it.
heat damage on polyethylene foam


No picture, but I also learned that you can clean drips of soft fiberglass resin and/or glue off the epoxy resin countertop with acetone, and it will not damage that surface.

The only thing I managed that looks like progress was to get the middle of the kitchen ceiling ready for the finish layer. I did the inside layer of this with the new Helmistik 1685 spray glue. I did learn that the nozzle of that gets a little clogged. I'll try to clean that with a pin next time I use it. Tomorrow may be a serious rain day which would hamper the trailer progress. The far section of the kitchen ceiling is again waiting for those two little braces to dry.
foam insulation on a trailer ceiling


It turned out to be a beautiful day! I had to go to the store to get the resin hardener, so I also returned the gallon of contact cement and found another piece of the trim strip I need to support the kitchen cupboard. I had hunted unsuccessfully for it the other day. Today, the store employees seemed to have no idea even though I had found a small scrap to show them what I was looking for. But, one guy helped hunt, and, yup! After we looked all the places I had searched, there was one more display of trim pieces I hadn't previously found, and there it was. However, I have to say that when you actually have a sample in your hand and the "helpers" in the store look at it blankly and can't come up with what it is, my confidence is not inspired. (The answer to the question is- PVC screen molding. Now I won't forget, at any rate.)

On the way home, I stopped to take one great autumn photo.


In other news, I edited and finished one big volunteer task.

See Battle of the Glues

Sunday, October 22, 2023

Trailer Repairs - The Battle of the Glues


I'm sure you're all familiar with good old contact cement. So far, this was the one product I had found that would actually hold things to the fiberglass. You may remember that the Loc-tite Ultra held to some extent, but not long term. (Other than using fiberglass resin, but that won't work to adhere large flat surfaces.)
can of contact cement


While we're here, let me show you this brush I bought. It has silicone bristles, just like the silicone barbeque sauce brushes, only shorter and more rows of them.

No one, not even the guy who's worked at Lowe's for 17 years (forget the kids who've been there 5 minutes and don't know what you are even asking for), could tell me if you could use it with contact cement. It says it's for wood glues. Well, it was only $3, so I gave it a try. Answer- it works great. You just let the glue dry on the brush and then peel the dry glue off. It won't stick to the brush.
silicone glue brush


Now back to the scheduled program. The contact cement is here to do battle with the product recommended by Scamp. This is Helmistik 1685. It's a Canadian product and very hard to find in the U.S., but I found a dealer who could sell it to me. (The Canadian companies won't ship it to the U.S.- at least not to an end user.). This is a latex-based spray, but let me tell you that except for the consistency and faint odor it has nothing in common with liquid latex. I've used liquid latex for stage makeup purposes quite a lot, so I know how that looks, feels, and smells.
Helmistik 1685 spray glue


I had pretty much decided, based on price, that I was going to glue the underneath layer of foam to the fiberglass with the Weldwood contact cement. I knew it worked. Well, that's what I thought I knew. But as I was taking down the rest of the ceiling insulation, I learned that some of the places where I'd used it to glue white foam to the fiberglass had let loose. So... good, but not 100%. But, I'd been using the open quart I had to begin putting the underneath layer of new foam against the fiberglass. I finished that, but hadn't opened that full gallon yet.

Yesterday, I tried gluing two pieces of the polyethylene foam (the white) together with the Helmistik. It's also a contact cement, so you spray both surfaces, let it dry for about 10 minutes and then press them together. I checked to see if you really could reposition the pieces before they adhere for good. Yes, you can do that. That's going to be really important for putting the finish layer back up.

Today, I experimented with the other options. I wanted to know if you could actually use it on the green foam- polystyrene. You can't use the regular contact cement on that. It's like pouring gasoline in a styrofoam cup. The foam just disintegrates. So I sprayed a small piece of the green foam. Where I used a light coat, it got a little dimply. Where I hit it heavier, it became shrunken or pitted- but it didn't really disintegrate. You can see the deeper damage in front of the white below. Well, that was interesing.

So, I decided to see if it would bond anyway. I prepped a small piece of the white foam and pressed them together. Voila! I believe this has actually formed a chemical bond. These are unlikely to separate without ripping one of the products.
polyethylene to polystyrene glue bond


I decided to see how well each of these would stick to the fiberglass using the Helmistik. Just to experiment, but not use a lot of product, I did one tiny piece of each color and sprayed both the fiberglass and the foams.

You can see that they are stuck, but what you can't tell from the picture is how well they are stuck. Trying not to exaggerate, I'm going to say that the bonds appear to be about three times better than the contact cement. I think the only way I'm going to remove these samples from the fiberglass is with the oscillating saw. I'm certain that if I just pull them down, the foam pieces are going to tear, being less strong than the actual bond.
polyethylene and polystyrene glued to fiberglass


Well! This has certainly changed my persepective. I think I have to return that unopened gallon of stinky contact cement. That stuff has serious fume issues for days after you use it, and you need to apply it with good ventilation. The Helmistik hardly smells at all. The Helmistik bonds better, and it's easier and faster to use. It will cost a little more, but not THAT much more. It will take a few days to get more cans of it here. The one thing I can not find anywhere is figures for square feet of coverage. Hopefully, the man I talked to when I ordered this first can might know something. I'll be calling him tomorrow. I'd like to order all the rest of what I need at one time. The shipping price is outrageous because it's considered some sort of hazardous product. (Believe me, I read all the fine print. This is way less hazardous than the familiar contact cement, but I'm sure there's a government regulation involved somewhere...)

This is like the miracle glue that I knew must exist somewhere!

And, I re-attached the finish layer on this one tiny section near the door. I just wanted to know how easy it's going to be to spray the first layer that's attached overhead and then put on the single sheet. Of course, this was the small piece, but it was easy peasy. I held a piece of paper up to mask the edges where I was spraying. There was no dripping. I repositioned the finish piece once, and it looks great. Of course, I knew it would look OK, but I'm also confident that it's going to stay up there this time.
foam on ceiling of a fiberglass trailer


The other thing I did was sand off some of that epoxy paint and fiberglass these two little braces to the frame again. Hopefully, they will stay put this time.


Believe it or not, just that, plus some more prep work with taking down the old ceiling took me three hours. Part of that was finding tools and products that have been put away for two years, but that time all counts.

Other than that, I edited in the morning.

See Trailer Repairs

Thursday, October 19, 2023

Trailer Repairs - 2A - Upper Kitchen Cupboard


Today, I worked on fixing the fact that the upper kitchen cupboard has come unseated from where it's supposed to be. You are looking up at the bottom of that cupboard This picture shows how the left front edge of it sits on rails fiberglassed to the walls (but hidden behind the "tile"). That part is fine. But if you look at the gap the arrow is pointing to, well... that is now also OK. That gap was over twice as wide. The whole cupboard had shifted out toward the center of the trailer.
fitting a cupboard in a fiberglass trailer


Why had it shifted forward? Part of the reason was that the screw holding that edge in place wasn't holding anything. I'm not sure how I managed to totally miss the block of wood it was supposed to screw to (behind the front of the cupboard and fiberglassed to the shell), but I did. The screw was in the empty hole. Now the screw is firmly seated in the brace.
fastening a cupboard in a fiberglass trailer


I'm also going to get a thin piece of trim wood and jam it in the "trench" where the wires are resting. That will brace it from the front against one of the main body supports of the whole trailer (which you can't see in this picture).

Now for the other big problem with this whole unit. What you see in this picture is, again, the bottom of the cupboard. The rough wood on the left is a temporary brace. Look at the junction line between the two arrows. You can't see much depth in the photo, but the bottom edge of the cupboard was supposed to rest on the top of that white trim strip. However, the fit wasn't quite good enough for that to work well, and particularly not after the whole unit slid away from the wall. So... the bottom of the unit sagged. I used a small hydraulic jack to lift it up to the height it's supposed to be and added that temporary brace until I figure out the solution.
fitting a cupboard in a fiberglass trailer


Since I knew from the beginning that the fit wasn't quite good enough, I had added an interior L bracket which should have kept the bottom from sagging. It does not appear that the brace the bracket is screwed to has come loose, so I don't quite understand how the sagging could have happened, but clearly this needs support from the bottom side.
fitting to hold a cabinet


I should have a scrap of that white molding left, but I couldn't find it today. If I can't, I'll probably get some more, or a different kind, to make the molding wider. Then the shelf can sit on it like I meant it to in the first place.

I also worked some more on the insulation, but I'm at an impasse (OK, I can finish taking down the old pieces) until the other kind of glue arrives to experiment with. That's OK, I have something I'll be doing all day tomorrow, so the trailer work will be on hold anyway.

In other news, I edited, and worked hard to pretty much finish a volunteer project.

See Repairs 1A- Insulation

Wednesday, October 18, 2023

Trailer Repairs - 1A - Insulation


This may come under the heading of the initial refurbishing because I've known for a long time that big errors were made and would have to be fixed.

For approximately 6 months of my year-plus on the road with Sunny, the ceiling has been falling down. Condition as of this morning. The only thing holding up that center piece is the light fixture and the vent trim.


Mistakes made- or at least lessons learned. I originally decided to use the green foam insulation for the underneath layer because at the time, it was cheaper than the white polyurethane. Now, the green foam has about doubled in price and they are about the same.

Meanwhile, you may remember my troubles with getting anything to stick to the fiberglass. The Loc-tite Ultra seemed as if it was going to work. However, it did not hold up to the constant vibrations of towing. Most of that has let loose. A few pieces are still glued or jammed in tight enough that they are still up.

Also, the butyl tape was not up to the task of holding a ceiling in place.

Before I was finished with the trip, we had used two different temporary measures to hold up the ceilings. Marie thought this one up. There is adhesive backed velcro hidden under the edge of the foam, and she ran a long string back and forth across the kitchen area. That worked very well, but certainly isn't a permanent solution. And you can see the string stretched and allowed the whole thing to sag a lot.


The other thing we did was across the area above the bed/table. I bought long pieces of the kind of edge fitting you use with paneling because it was rigid in the short direction and flexible in the long direction. We jammed a couple of those above the walls like the hoop stays in a covered wagon. Not elegant, but they kept the foam ceiling in place.

So... the ongoing problem is twofold-- I need something that sticks to the fiberglass, and I need to replace the green foam. I already knew that contact cement will stick to both the fiberglass and the white polyethylene. But the contact cement dissolves the green foam.

Last week I ordered more of the polyethylene foam for the underneath layer. It arrived on Saturday. But I still was wanting to find an alternate product that might really stick to the fiberglass.

1. The foam company had no idea. 2. I contacted 3M, and they actually have an industrial tape that they said would work. However, it would cost about $1000 to get enough to do the trailer. No- at least, I hope not. 3. I called Scamp. They are the company that makes the most popular fiberglass trailers, and they are known for being very helpful to owners of any brand of fiberglass trailer. They recommended a spray adhesive I'd never heard of, but they said they are not licensed to sell it to me. I found it on line. Well, it's made in Canada, and they can't ship it to the U.S. I spent about an hour, and did find a U.S. company that could sell it to me. I have a can on the way. More about that later.

So today, I got busy (the weather was nice) and started replacing the green foam on the ceilings. I started with an easy area first, above the door. Since the layers of foam are now both the same color, it's not going to be as easy for you to see what I'm doing. Right now, I'm pulling down all the green foam, cleaning off any glue that still clings to the fiberglass, cleaning the fiberglass, and replacing that layer with strips of white 3/4 inch foam.

I've decided to use the contact cement to glue to foam to the fiberglass. That layer isn't as precise a job and the contact cement is relatively inexpensive. The main problem with it is that once you touch the two surfaces together, you can not reposition the products.

The glue I have coming should allow for some time to reposition. That will be important to put that finish layer back in place.

Some of layer 1.


I didn't get a lot done. That's the bad news. The good news is that it's going to work, and I made a start.

Here's the kitchen ceiling, back down to the fiberglass. Sigh.


The bigger problem is that I've discovered that some of the places where I actually fiberglassed braces to the shell have come loose. I suspect the problem is that danged epoxy paint (the pinkish color- applied by previous owner ). I'm not taking the entire trailer back apart. But I will have to redo a couple of pieces, sanding off that paint. And I can't do them for a few days because it's supposed to rain for the next three days. You may recall, the fiberglass won't set up in high humidity. Maybe I can just do the sanding.

I also forgot that there is an issue with the front upper storage unit. It has come "unseated" a bit. I hope that isn't going to be a horrible problem to fix.

I sure hope there are going to be enough decent days to get this project finished. Sunny and Marie and I have a trip planned for January.

See Trailer Insulation

Tuesday, November 30, 2021

Rollin' in the Sunshine - Second 2021 Interior Tour

  What a beautiful ending to Sunny's final day of preparation for this trip. fiberglass trailer in the sunset

The cushions were all finished two days ago, and they look as nice as I had hoped. I bought that little rug at the last minute because the floor was so cold, and it helps a lot. Looks good too. The little heater keeps the interior nice and warm. interior of a fiberglass trailer decorated in blue and yellow

If you are wondering what that funny wooden thing is on the floor, it's the piece that allows me to make the entire bench space into a bed. Here's what the whole space looks like made into a bed. A regular double-bed fitted sheet is perfect to unite the space into a sleeping area. interior of a fiberglass trailer decorated in blue and yellow

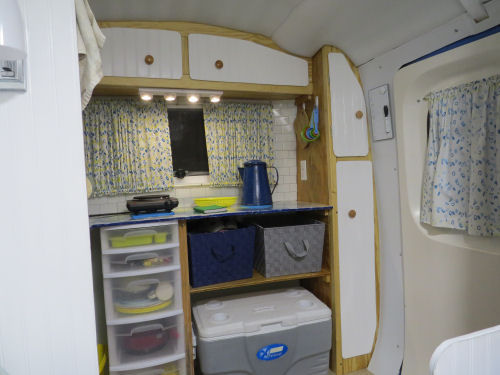
Here's a view of the kitchen area again, with everything except the coffee pot, which I'll take out there in the morning. interior of a fiberglass trailer decorated in blue and yellow

Monica says she's ready to play hooky and run off with me. (Sorry I caught her blinking.) person in a fiberglass trailer

Just a look at the table area from a different angle. interior of a fiberglass trailer decorated in blue and yellow

The storage area of the kitchen. interior of a fiberglass trailer decorated in blue and yellow

And finally, what we hope may be the solution to too many loose shoes on the floor. It's all fastened with Command Strips, so if it doesn't work, it can come down without damage. interior of a fiberglass trailer decorated in blue and yellow

Stacy came and helped me all afternoon, and then Monica came after work and helped for several more hours. I just have to go out and stow things in the trailer for travel, but that doesn't take long. With their help, all the extra details got taken care of, and things are put in their places. I spent ALL morning making a few phone calls and doing the last round of errands. This took until 1 pm! But I did get them all done.

And the list? I got the last 3 BIG ITEMS done. OK, so I dropped 5, but nevertheless, I have done 57 major projects (defined as needing more than one day to complete) in the past 75 days. Most of the little ones are done. I sort of quit counting. A few can go on the road with me. Not ideal, but workable. A few are just out of luck.
Teeny is packed, and as you may have seen on Facebook, weighs 28 pounds fully loaded with 5 days of food, and 1 day of water. I'm really happy about that. All my clothes for tomorrow are stacked up. The house is semi-restored... OK, there's just less chaos, but there is only 1 extra table set up in the living room instead of 4. That has to count for something, right? The dining room is hopeless, but it's been that way for 5 years... what's one more?

I need to decompress for a bit, stow the gear in Sunny for travel, and then take a shower before bed. I'll be on my way in the morning! Sunny is being delivered to his first stop on the next day. I haven't yet gotten my head around the magnitude of this. And remember... if I don't blog tomorrow, it only means I don't have any cell service. There are no cliffs for me to fall off of just yet!

See First 2021 Interior Tour