I have decided to do a series of posts about how and why to tie the knots I use all the time while camping. Toward the end, I will probably throw in a few I don't use often, but they are still good to know.
The series has to begin with the good old, absolutely basic square knot. There are a couple of problems it won't solve, but for general use, you just can't beat it. In fact, you really should know how to tie a square knot if you never, ever plan to go camping.
If you want to play along, get a couple of pieces of rope or fat yarn, or something you can practice with. Two colors aren't necessary. That will just make it easier for you to see where the ropes are winding and twisting in the knot.
In most cases, a square knot will not slip when placed under pressure, but will self-tighten. (We'll get to the exceptions to that later in the series.) Here's how it looks.

First of all, let me say that I hope to get some better ropes for these pictures. On the spur of the moment, these two were all I could find that were about the same size and two different colors.
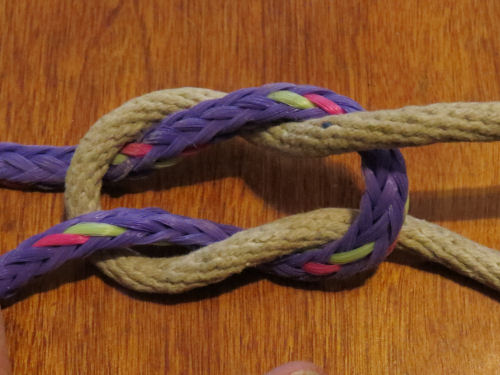
Notice that it looks like two intertwined loops. A bent loop of rope is called a bight. Now you know!
To tie it, take the two ropes and twist them together into an overhand knot (which isn't a knot at all, because it won't hold anything). Then stop and look at it. Notice which rope is on top. In this case, it's the purple rope on the right side. Take the rope that is on top and make sure that when you tie the second overhand knot to make the second part of the square knot that you keep that rope on the top side. Look at the top picture again.

Another way to say this is that the first twist is right over left, then left over right. But it doesn't matter which order you do them in as long as the two are different.
If you do them the same, you'll end up with a granny knot, like this. See the difference? The bend or bight on each side has not stayed either on top or underneath, but is woven over and under.
This is not good. When you put pressure on a granny knot, it twists into a square with a rope going in each direction, and will continue to slip until the shortest end just pulls through.

Once you get used to changing directions between the two twists of a square knot it will become second nature. I had to think about it to produce that granny knot!
There are a couple of other knots that are nothing but square knots that look a little different. We'll get to them too.
In other news: I edited and formatted, but a also went to a meeting in the middle of the day. 370 pages done.
2 comments:
Good info to know. I'm looking forward to seeing the rest
It's nice that you used two different colored/patterned ropes which makes it much easier to demonstrate. There are several knots we all need to know: square, 2 half-hitch, timber hitch, sheet bend, bowline, figure eight (which can also be used as a substitute for bowline) and clove hitch... for camping and sailing, these are essential (several others could be added in for fishing)!
www.thepulpitandthepen.com
Post a Comment