
Now for some details to record what I did, both for me, and to maybe help someone else. I used Brightside Marine Enamel paint for this project. It's pretty difficult to work with, but I like the hard, shiny finish it gives. I think it's an excellent choice. I've read of people using other paints, but I'm hoping to only do this once, and I think this is my best shot at that option.
The specs say you should use it within a year. Ha. I bought this 2.5 years ago. I did have to stir it significantly, but it was OK. Probably should not wait 4 years. The special Interlux 333 solvent is used to wipe the surface to prep for the painting. It's really expensive, but you don't have to use it for cleanup. Regular mineral spirits worked fine for that.
Just before painting each coat, wipe the entire surface with the Interlux 333. It doesn't affect butyl if you touch it, but if you've used that automotive adhesive anywhere, it will dissolve that and spread black streaks. I had to be really careful around the roof vent. You also need the Pre-Kote primer that is made to use with this paint.

I bought the exact applicators the Interlux company recommended. This was a plush roller (to use with the Interlux Pre-Kote) which came with a flimsy plastic tray. It worked, but a more solid tray would have been nice.
For the enamel, a got a two-pack of foam rollers (one is in the picture). I spent $25 on a professional Redtree "badger bristle" brush for the "tipping." I can't say enough about how good this brush was, but I learned a hard lesson and ruined it. You can't wrap a brush with this paint in plastic wrap and leave it for a couple of days. It hardened up, and I could not get it to soften- yellow brush in the picture.
So I had to buy something locally in a hurry. I got a Wooster white china bristle brush. The hairs were coarser, there were fewer of them, it was cut straight not feathered. It was prone to losing bristles. It separated into clumped groupings when trying to paint an even line. Even though it was a not a cheap brush, it was not even close to the same quality. Perhaps if I'd driven twice as far to a real paint store, I could have gotten another high quality brush. But I didn't. This worked, just not as well.
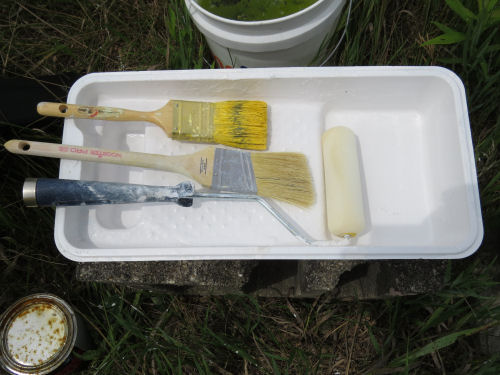
Let's talk sandpaper. You have to lightly sand the surface between each coat of paint. You don't want to use anything coarser than 220 grit, and for the final sanding, 320 is better. Well. I definitely recommend the paper on the left with the clear backing. The one with the black backing was leaving black streaks on the paint.

Techniques: This paint is wonderfully self-leveling. That's how it makes such a smooth hard surface that looks good. But. You have to apply it thinly and evenly. Sure, spraying would be better, but that wasn't an option for me. So the next best thing is "roll and tip." You paint the edges with the brush, then you roll the larger areas and "tip" them with the brush.
First, let's talk about the viscosity of this paint. It is thin and sticky. You need to get it on evenly, but you need to keep it from being one molecule thicker than it can tolerate or it will run/slump. You don't want this. I had some trouble with that when I painted those window wells two years ago. Sure I could have sanded it off and started over. But I didn't- more on that in the flaws section.
So, you cut in the edges on a small section you are ready to paint. I'd say not more than 2 feet on a side if you are working alone. You could probably do more if you have two people- one to roll and one to "tip." Then you roll the paint on the open area. Here's my advice on the rolling. Get the paint as evenly distributed on the roller as possible. Roll the livin' daylights out of it in the pan. Roll as little as possible on the surface you are painting- just enough to completely cover with a THIN coat so it won't run. And don't press hard on the roller, or it oozes little lines out of the ends that you then have to brush out.
Now for the "tipping." Can you see the bubbles in the next picture? The roller will leave patches of these. Take the brush and just lightly smooth the surface of your paint. Remove all those bubbles. If you miss some, they will turn into a landscape of tiny craters when they dry, and you'll have to sand them out. You don't want to use the brush to distribute paint. That's why getting it on evenly with the roller is so important. You just want to smooth that surface, and you can actually see the paint leveling itself. It becomes tacky almost instantly. That's why you don't want to try to do a large area.

Now we are going to move to the flaws section of this post. Let me say, let me shout, "I'M QUITE HAPPY WITH WHAT I'VE BEEN ABLE TO DO." I don't want any lectures about how I'm putting myself down, or being too picky. I just want to honestly show you some things that I either did not have the skill level or the patience to deal with. When I started this project, I had delusions of infinite time and perfection. I'm working on being more realistic.
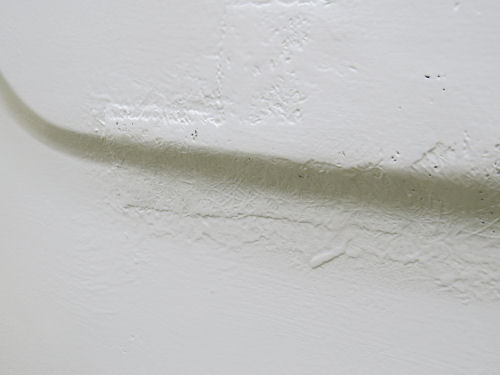
First- and you've seen this before- is where I had to rebuild some of the shell at the central seam in the back. I had already decided I could live with how it looked because I did succeed in stabilizing the structure there, although it ended up thicker than the original. Here's how it looks after all the painting. It's the section below the hump. Wide, but not terrible.

Here's some detail of that large hole I had to patch. Well, I probably could have gotten this a little smoother. I admit to running out of patience. I was so pleased at how good I'd gotten it, but I stopped just a little shy of what I could have done.

And the section below that large patched area doesn't look good at all. But I had already decided I wasn't going to agonize over this. I got it to stop leaking, and this is less noticeable than you might expect because it's so low.
I am a little disappointed that most of the holes I Bondoed aren't smooth. I think this comes from not having enough experience. That said, I went out to take pictures of the ones that show, and the truth is, you can only see the lack of even-ness in certain lighting. I'm going to chalk this up to the signs of a life-well-lived on a 36-year-old trailer. Like wearing your scars with pride.

And I ended up with some small holes that just didn't get filled. There were hundreds of these, and I missed some. I also would have had to buy another quart of Bondo for those last few holes. I scraped the dregs out of the can I had. See paragraph above about the philosophy of scars.


The truth is... there was a time when I would have let these imperfections get to me. Not any more. I think that since my past experience with fiberglass was limited to patching a couple of holes in a canoe, and no experience at all with Bondo, I'm going to say that I'm not ready to hire myself out doing this, but it's good enough to suit me.
So there you have it. Sunny is painted. Tomorrow, I'll clean all the light covers and put them back on. I already reattached the door hardware so I can close it up properly. And I'll cover the join of the two colors with the striping tape.
In other news: I edited, I wrote a little, I looked up some sources for more stuff I need to continue working on the interior of the trailer. A productive day!
 | See Day 126- 2nd Coat |
3 comments:
This project certainly was a learning experience. I think you passed the final test though because the trailer looks great. I'm betting a lot of these flaws wouldn't be noticeable unless you pointed them out.
Thanks Ann!
Lulu: "We think you did an amazing job ― the trailer looks great!"
Post a Comment