Entries to Win Afghan

Sign up to receive the Books Leaving Footprints Newsletter. Comes out occasionally. No spam. No list swapping. Just email me! jhyshark@gmail.com Previous gifts include a short story, a poem, and coupons. Add your name, and don't miss out!

Saturday, August 31, 2019

Country Drivers

 
I did reasonably well at the vendor event today. It was mostly a flea market. I didn't realize that, or I might have looked for somewhere else. But, I came out in the black, so I can't complain.

And you know what I did on the way home- back roads!

But this picture is too cute to leave out. Big brother is getting a head start on helping his sister out of vehicular crises. She really was too young for that toy- she would hold the steering wheel, and the battery would move the jeep forward, but she was looking all over the place and not having a clue about steering. Fortunately, it didn't move very fast.

kids driving a battery powered jeep

I headed out to do some country driving myself. Found a good road.

single lane road

Came across a sign about restoring Oak Savannas. What? Out in the middle of nowhere?

interpretive sign about oak savannas

Backed up, and here's why the Forest Service put a sign there. Can you see it? This is a crossing of the North Country Trail! Blue blaze, nice treadway.

North Country Trail

That was good for a big smile.

In other news, I fooled around in the trailer a little bit when I got home.

See I Can Make Any Two Hour Trip Take Four
if you like this blog, click

Like This!


Friday, August 30, 2019

My Trailer Redo - Day 94 - Wall 2 and Playtime

 
I did it! I got everything structural done on the inside of the trailer that I wanted to before we take it on a trip.

That started with finishing the far side bench. OK, I'm fudging a bit on being done. That back bench brace is just not right, but now I know why. I was using the brace that was factory installed as my guide for the line to continue. Mid afternoon, I was sitting in the trailer just looking at things. Sometimes that's how I solve problems- I probably spend way more time sitting and studying the situation than most people would think necessary. But it has saved me some real goofs, and has given me some solutions to tricky difficulties.

Anyway. I was sitting on the door side bench. I laid a level across it. Near perfect. I laid the level across the table (bed center section). Same. I laid the level across the far bench. Problem. So that bench has been sitting on a fairly severe angle for 34 years. I'll have to cut out all those supports and re-fiberglass them in at the right places. That wasn't happening today. I figured it could wait a little longer since it's been crooked but usable for those 34 years. So I left the old bench seat on that side, and just cut the extra piece. Put all that together.

bench framing in a fiberglass trailer

Then I cut out that second wall piece just like the one I did yesterday. While the paneling and the plywood were still clamped together (right sides together) I set it in place for a dry fit. Again, it looked really stupid laid out on the paneling, but I made the front edge straight with one of the lines, and you'll see that it looks good. Actually, this was pretty tricky and took forever. I made a full cardboard template, using a plumbline to get the front edge straight and the back edge matched up to the curve of the wall.

dry fitting a wall in a fiberglass trailer
Made a couple of little tweaks with the saw, and glued and clamped it.

gluing a wall for a fiberglass trailer

Waited until almost 8 pm, so the glue could set up, then screwed it in place.

Meanwhile, I started having some fun. I put the old grubby carpeting back in (trimming to fit in front of the benches and around the new walls) just so there will be a floor cover for our trip. Vacuumed and put in the old cushions.

Put the storage tubs and the cooler in. They drawer units need securing, but I wanted to play! The tablecloth is superfluous, but it looks nicer than the old cracked table. Eventually, the wood sides of these walls will be sanded and polyurethaned.

partially finished interior of a fiberglass trailer

Here's the view on the white side of the walls while siting on a bench.

partially finished interior of a fiberglass trailer

I confess, I got a little choked up, sitting there, realizing it's really going to happen. Said a little prayer of thanks that I'm being allowed to do this, and that so far it's turning out as nice as I dreamed up.

Stopped playing when it got too dark to see.

I won't show you the little temporary tweaks every day between now and Friday, but I'll do a final "reveal" of what it looks like when I'm ready to roll. And I shouldn't need to spend all afternoon, every day, getting those accomplished. I have other things to do to get ready!

Tomorrow, I have a vendor event, so I'll be tired in a different way tomorrow. Today, I'm beat again, but I'm so energized about the trailer I hope I can sleep.

See Water and Wall 1
if you like this blog, click

Like This!

Thursday, August 29, 2019

My Trailer Redo - Day 93 - Waiting for Water, and a Wall

 
I thought I was only going to be able to say that I spent the day waiting for water, but one wall happened!

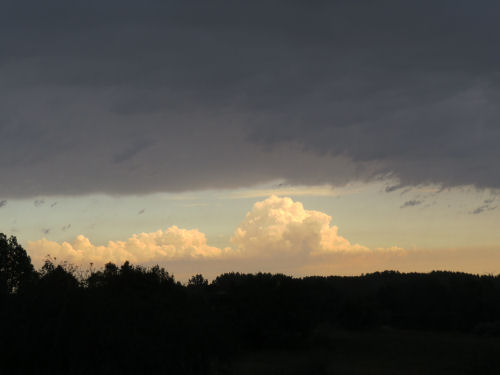
This is what the afternoon looked like. The skies got darker and darker and the wind was blowing pretty well, but I kept working until the sky started playing with electricity. Then I decided it was time to put away the power tools.

stormy sky

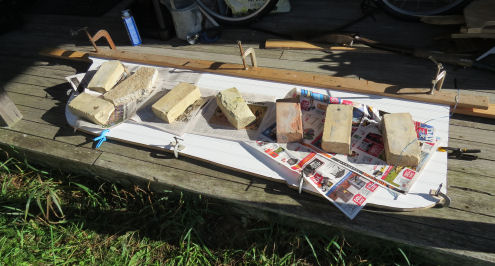
Before that happened, however, I clamped the beadboard paneling to the plywood and cut them out together. I want the two partial walls I'm putting in to be sturdy, as part of the internal support system. I decided they didn't need to be 3/4 inch ply, but I want them solid.

laying out a custom wall section for a fiberglass trailer

Then I glued the two pieces together, just as the storm was starting. My hobby clamps were large enough to go around the edges of this, and it's a good thing. It needed some persuasion to stay together evenly. And I had forgotten how much I hate the smell of fresh-cut masonite.

As I was cutting this, I was having second thoughts about my wall covering choice. Given how totally, totally un-true everything is, suddenly a wall board with vertical lines seemed like a bad decision. I chose to make the longest straight edge line up with one of the grooves in the pattern.

I also thought maybe it was going to chip like crazy when I cut it. I tried a scrap first, with masking tape on the finished side and clamped to a piece of scrap wood. I cut a wavy line in that (scroll blade on the sabre saw), and it was fine. So that was a relief.

But I ended up taking the glued and clamped wall into the house because it started pouring. The wait for the water from the sky was over.

gluing layers of a custom wall section for a fiberglass trailer

Went out and sat in the trailer while it was raining. Still weeping under the old air conditioner hole, but I got the leak to move. I'm not too worried about this. I'll keep adding to the outside fill every time I do a batch of fiberglass, and I'll get this one stopped.

leak a fiberglass trailer

What I was hoping for was to find the source of another leak. When I moved the table the other day, I discovered another puddle in the center back. I watched diligently, but not the slightest bit of moisture came down the back wall. Well, Marie and I will probably have some chances to chase it down on this trip.

I also did some non-trailer odds and ends, and ate dinner, and the sky cleared up and the sun came out. I REALLY wanted to get more done today, so I went back out. The wall pieces seemed to be holding together fine, even though they hadn't been together anything like eight hours. But I was feeling impatient.

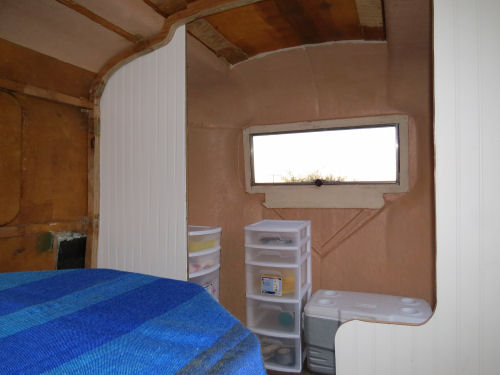
So I screwed that wall in place. It will have to come back out again when I put the flooring back in, but that's OK. This will give me a chance to have a test run with it to see if it's working out. I tacked the front uprights of that bench to the floor, and put on the bench tops, tacking in place the one that doesn't need to provide any access. That nicely holds things more rigid. The others are loose for now.

That side of the trailer is ready to go! It's pretty cool to have one tiny bit of the final finish wall in place. (No trim yet, of course.) And it looks fine! The vertical line along that front edge is where it needed to be no matter what is actually vertical (although that pretty much is).

 custom wall section and bench for a fiberglass trailer

I decided to do a little bit on the other side. Worked on that back bench brace. Of course, it's not the same as the door side, so I had to just do it in two pieces. It's ready for fiberglass.

And I made the extension for the bench upright for that side. It's ready for corner braces.

That "wall" is just the old bench stuck in there upright to give me a sense of what the wall will look like. I have it marked out on the plywood sheet, but things were too wet on the porch to try to cut it out this evening. But I'm in good shape to continue tomorrow. I checked that back brace with a level, but it sure doesn't eyeball right. (Not that little nubbin- that's just balanced there.) Will check again before I add fiberglass.

bracing for a bench section in a fiberglass trailer

Here's what the sky looks like now!

sunlit shelf cloud
"
I really want to get this second bench and wall done so I can move on to some temporary refinements. Marie and I are going to live in this for almost 3 weeks, and I can easily jury rig some pieces of the storage so that things won't be such a mess inside, with nowhere to put things. If I get the benches and these two walls in place, then I'll have time to fool around with the little things that will make our "home" more pleasant.

But now, I'm really ready to settle down. I didn't get to sleep till after 3 am last night because I was just so wound up about the trailer. Could not stop planning all kinds of things in my head. Solved a couple of small issues, I think, so that's good at least.

See Bracing and a Bench
if you like this blog, click

Like This!


Wednesday, August 28, 2019

My Trailer Redo - Days 91,92 - Bracing and Bench

 
I worked on the trailer project 5 hours today, and finally, it looks like something happened.

The most important part is that I finished the structural bracing. I took these two pictures lying on the floor and looking up at the roof.

structural bracing ribs in a fiberglass trailer

structural bracing ribs in a fiberglass trailer

When the last of the fiberglass was really and truly dry, I performed the first crucial test. I took away the brace from the outside wall that had been pushing inward. Then... the big one... I removed that temporary crossbrace that was bolted right across the middle of the trailer. There were no explosions of cracking fiberglass, no little tearing noises, no popping as walls tried to move, nothing. That is wonderful.

The second big test will be when I tow it. Hopefully, nothing will happen again.

And, hallelujah! I can stop having to work around that board that was right across the middle of the trailer. That was beyond annoying. Doing contortions to get anywhere was getting old.

My other goal for the day was to get the door-side bench roughed in. This meant I had to make some decisions I'd been putting off. Mainly, about the configuration of the seat panels that will be hinged to provide access to the storage underneath.

As a reminder, I am extending the benches on both sides to make them longer. So I had to extend the back bench support. At first I thought I'd just ignore the wheel well and put in a chunk of 2x2 ahead of it. Did that, and decided I didn't like it, so I ripped that out before the fiberglass set up, and cut this custom piece. Let me just say that every single piece of anything inside one of these trailers has to be custom cut. Nothing is square. Anyway... I know this is very thin in the middle, but I preferred to have the support continuous.

bench support fiberglass trailer

Then I extended the front panel of that bench to the new length. That was a piece of cake, except that I had to go to the store to get corner braces.

bench support in a fiberglass trailer

Got those done, and cut the sections of benching for the seats. That partial wall is, again, just balanced in place, and it's not actually the exact correct size. I rough-cut it bigger until I could see what was going to pass for orthogonal once it was in place. Good thing I did. It needs to be trimmed up quite a bit.

bench in a fiberglass trailer

What you can't see in this picture is that the bench pieces are rectangles and the spaces they need to fit on are not. They all have to be trimmed before the cut and bracing for the hinges is added and a finger hole. But they are fine for right now. My goal is to get this usable by September 6. I can just tack the benches back in place temporarily and it will be fine. The paneling on the front upright is still the old stuff, and obviously not across the extension I built. That doesn't matter right now either. That is all finish stuff I can do another time.

Tomorrow, if it's not raining... I'll get that partial wall cut and attached, and start on the second bench. There is more fiberglassing to do on various supports, although that big bracing job is done, done, done! I'm beat, but it feels good.

In other news: I wrote in the morning, and bought a couple of groceries while I was at the store. Everything else is trailer.

P.S. Boy can I tell I'm old and wimpy. I used to be able to lift and carry (not drag) a full sheet of 3/4 inch plywood. Now I have to drag a 1/2 inch sheet to move it. But I got 'er done.

See Water Woes
if you like this blog, click

Like This!


Tuesday, August 27, 2019

Yellow Flowers

 
Today was very busy, so just enjoy some cheerful yellow flowers.

First is gray-headed coneflower. Note the strongly reflexed rays (petals) and tall central disk. Ratibida pinnata

gray headed coneflower

This is good old black-eyed Susan, Rudbeckia hirta

black eyed susan

And what was I so busy doing? Wrote all morning, then had to go to the bank to straighten something out- you know errands like that always take forever, and a trip to the hardware, then worked on the trailer. I feel as if I'm getting somewhere, but any pictures would look the same as what you've seen. Maybe tomorrow there will be something new to show. Then I had writer's group in the evening. I'm beat, but it's all good.

See Garden Coneflowers
if you like this blog, click

Like This!


Monday, August 26, 2019

My Trailer Redo - Day 90 - Water Woes

 
Today it rained pretty much all day. That's sort of the good news. I spent a lot of time inside the trailer watching carefully to try to find out where it was leaking except for the door. That's a given.

Talk about insidious. Look just ahead of the arrow point. See that little weep spot? That is the source of an awful lot of the water that spreads on the floor. As far as I can tell, it's all of it, except what is getting in the door. It must be a place where there isn't quite enough resin impregnating the fiberglass mat below that big hole where the air conditioner was. It runs right down the wall and pools in a little trough at the edge of the floor and then spreads across the floor. Amazing.

leak in a fiberglass trailer shell

Technically, I'm still working on that air conditioner hole patch job. There is more fiberglass filling to do on the outside, and then Bondo, and then paint. Nevertheless, I'll make sure this whole area gets some more fiberglass work when it's dry.

Then, there's the door. The rain was not from the east today, so the water didn't actually blow inside. But it does come down the top of the door and run down the inside face of the door. Then it drips off to the outside because of the large gap at the bottom. But I tried for a temporary fix that will lessen the amount of water that gets in.

Found pool noodles still at the dollar store. Made gaskets. Water was still dripping down inside.

temporary gaskets make from pool noodles

temporary gaskets make from pool noodles

On one trip where Marie and I were in the trailer in a big rain (when the door fit even more poorly- before I had done anything about the bracing) we discovered that if you can find a way to fasten plastic inside above the door and then drape it outside, the water has to run back out to the outside. Well, the pool noodle solves the problem of how to fasten the plastic in a heartbeat. I tucked a trash bag into the cut edge that slipped over the door frame on the inside and flapped it to the outside.

plastic bag trail door gutter

The other thing I learned about rain is that it and fiberglass work don't mix. I thought I could continue putting the braces in by just working inside with the door closed. Got one batch of fiberglassing done on the brace I worked on yesterday and the second piece. Well... the resin won't set up in 100% humidity. Hours later, it's still soft and slidey. (Yes, I remembered to add the hardener.) Anyway... I got one more step done on that puzzle. Since I only have 5 clamps, it's best to work on five strips at a time, and that's about what one batch of resin will do anyway.

The rain is supposed to end before I'll get out there working tomorrow, so hopefully, I'll be able to keep going with the braces.

In other news: Finished my newspaper column in the morning, did errands along with getting the pool noodles, and worked on the trailer. That's about it.

See Some Bracing Progress
if you like this blog, click

Like This!


Sunday, August 25, 2019

My Trailer Redo - Day 89 - Some Bracing Progress

 
Another day with a lot of time spent and not much to show for it. Anyway, here's what I accomplished.

For starters I glued the sections of the two braces that are cut from 3/4 inch plywood that are mated to make a brace 1.5 inches wide. I used Liquid Nails Heavy Duty for this. There is nothing on the tube about how long this should set up. Can you believe that? I figured a couple of hours. Looked it up on line. Overnight. Hmmm. Should have made myself do this little task yesterday, so they'd be ready today. But I didn't.

mating braces for a fiberglass trailer

So, anyway, I glued and clamped/weighted them, and added a couple of screws through the set for extra security. They will be ready for the next work day.

mating braces for a fiberglass trailer

Meanwhile, I'm doing little batches of fiberglassing. I thought it would be easy to fiberglass the braces in. It's easy enough, but you can't do it fast. Here's why. You can't make the bends around the braces without the wet glass and resin pulling away from the side you just did. So, I first did just the tab that is fastened to the wall and one side of the wood brace. This is the single width one beside the door that will have a wall attached to it.

I let that dry, and managed to use up the rest of that batch of resin with patching the few remaining holes. I try to leave the little jobs to use up the end of a batch of resin, because it's only usable for about ten minutes, and I hate to waste it. You can keep a disposable brush soft enough in acetone for about three batches with cure time between, but then that has to be chucked. So every day that I fiberglass it costs a dollar for a brush. I know that's not much, but they add up.

glassing in braces on a fiberglass trailer

After the first side dried hard enough that it couldn't move- about an hour- I bent the glass over the wood and glassed down the next surface. That wouldn't stay in place at all. So, I covered it with wax paper, which won't stick to wet resin, and clamped a chunk of wood in place to hold it down.

glassing in braces on a fiberglass trailer

Then I had to wait again. Final accomplishment? I got the lower half of the brace by the door fiberglassed in, started the upper half, and got two of the four little holes sealed up. They can have a couple more coats with the next batches of resin.

glassing in braces on a fiberglass trailer

I'm thinking these braces are going to turn out to be the absolutely hardest part of the entire project. I sure hope so. This is a pain in the patootie. Not much progress, but at least it is progress.

In other news: I wrote in the morning, and hope to write my monthly newspaper column yet tonight.

See Bracing and Frustrations
if you like this blog, click

Like This!


Saturday, August 24, 2019

It's Almost Always the Little Things

 
Had a good sales day at the Shagway Arts Barn vendor event. But I want to tell you one little story. OK, two.

One of the other vendors, Chris, had seen me eyeing little drink cozies that she makes. We met a couple of years ago at Shagway, and have often participated together in work days out there, and sales events.

I don't like drinks in cans, and I don't need more stuff, but not only does the barn motif appeal to me, the colors and everything about it just strikes me as pleasing. Now, these are very reasonable, and I could certainly afford to buy one. I told her I was thinking about buying one to use as a pencil cup. I have been using an old tin can. Well, she gave it to me!

needlepoint pencil cup with barn motif

This is the epitome of the saying, "In a world where you can be anything, be kind."

And this inspired me to clean off my little chairside table top, above.

Chris makes lots of nice quality craft items for sale. Here is her booth from last month. She's on the left and her sister, Jan, on the right. Look her up at local craft and vendor events.

craft vendor

My other little story is from the booth on the other side of me. Dixie was lovin' up to her human mama, Amanda. Dixie also gave me plenty of doggie kisses and snuggles. She was a real sweetie.

dachshund snuggling

These are nice reminders that although once in a while there is a big event that makes us joyful, it's usually just some little thing. This is what "My Quality Day" is all about.

Thanks, Christina and Dixie.

PS, and Ellen, because that little patterned towel I have on that table to catch drips or whatever, was a gift from her a couple of years ago.


See Trail Work Day
if you like this blog, click

Like This!