Entries to Win Afghan

Sign up to receive the Books Leaving Footprints Newsletter. Comes out occasionally. No spam. No list swapping. Just email me! jhyshark@gmail.com Previous gifts include a short story, a poem, and coupons. Add your name, and don't miss out!

Monday, April 29, 2019

Bread Day and a PSA

 
No promises that I can keep this up, but I did manage to make another batch of bread. I thought these loaves might come out better than the last ones. I identified a potential thing I could tweak, but it didn't help. They aren't bad, but I never can seem to get my bread to rise quite enough. But this recipe is better than some I use, and it tastes good.

homemade bread

However, it turned out to be a much bigger project than I had in mind. I wanted to add a little rye flour, which meant I need to get into my "grains" tub.

Notice up front- if you don't like bugs, just back away and wave goodbye.

But we have a horrible problem with grain moths. Plodia interpunctella, also called indian-meal moths, pantry moths, flour moths, etc.

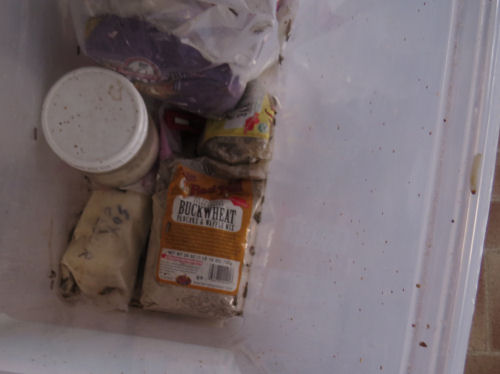
I thought I had everything in this tub sealed adequately. So I opened it up to find the rye flour, and as you can see, there are moth bodies down among the packages, and even a worm in the groove at the top edge. (Not to mention frass- moth poop)

tub with packages of flour and grain moths

I'm not going to try to tell you how to get rid of grain moths. I've decided it's impossible once they get established. The moth traps are too small- they are expensive and they fill up. All of this comes under the heading of management. We kill them whenever we can. They fly fairly slowly and we are adept at clapping them dead in midair. We try to keep everything sealed (although they can get even into screw-top jars. I'm convinced the moths lay eggs at the edge of the lid and the tiniest of the larvae can crawl up the threads.) We keep a strip of flypaper hanging in the kitchen. I know it looks gross, but these buggers do a lot of damage to food, and I need to keep trying to get rid of them. I put anything in the freezer if I think it's got eggs laid in it.

So far, I have found exactly two things that keep them out. I bought a small tub with a really tight rubber seal that I keep my everyday flours in.

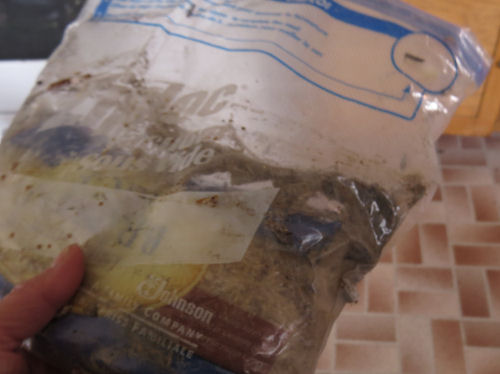
And, what I verified today. Here's what doesn't work. Regular weight store packaging, like the inner liners of cereal boxes, plastic bags that specialty flours come in, etc. Even if I seal them with my heat sealer, the worms are able to eat through the plastic to get to the grains. For example: Note the horrible larval mess inside this bag that was heat sealed.

packages of flour with grain moth damage

So, that one went in the trash.

And here's a Ziplock vacuum bag. Do they even sell these any more? These don't seal well enough. Again- see larvae on the inside. Trash.

bag with moth larvae inside

Now for the success story. So far, I've never found one of the real vacuum sealer bags that they could penetrate. Every package that I had closed up in a vacuum sealer bag was OK on the inside. Had to clean off the outsides, which I did with the vacuum cleaner and then a wash with hot soapy Clorox water, but the contents are fine.

vacuum sealed bag excludes grain moths

New rule for self: Nothing goes in that tub unless it's in a vacuum sealer bag.

Here's the kind of sealer I'm talking about, and the heavy bags on a roll that come with it, or you can buy separately. Mine is Food Saver brand, but there are others.

Food Saver bag sealer

So, the bread is made, the tub is cleaned, the vacuum is emptied and the trash is gone to the curb- get those moth generations out of here! This job was not originally on today's list.

In other news: the next chapter will be a long one. Long hike, journal hadn't yet been transferred to digital. That is now done. That was my big writing accomplishment for the day. And I'm working on my program that I give tomorrow night about self-publishing.

See Chilly Day Comfort
if you like this blog, click

Like This!

Sunday, April 28, 2019

Crash

 
After a really productive morning (I finished chapter 16 of North Country Quest), I could not make myself do anything all afternoon, so I guess it evens out. Spring continues to cheer me, although I guess we are returning to gray tomorrow. The forsythia is blooming and the sky was mostly blue. Can't beat that!

forsythia

Clothes on the line. One of my favorite things, as you know.

clothes on clothesline

And a big tom in my backyard with a harem of three. He spread his tail, but I could not get to the camera in time to catch it.

turkey

Tomorrow, I can't goof off. I have to get all these presentation projects finished up in the next couple of days. Hopefully, tonight I will sleep well, which did not happen last night and led to the crash today.

See Springy
if you like this blog, click

Like This!

Saturday, April 27, 2019

Tiny Trailer Miscellany

 
There isn't much from today that is picture-worthy, so I'll just show you this tiny bit of forward progress on the trailer. It doensn't even count as a "day" of work, but these needed to happen.

I got one of those on-line coupons for Lowes that was only good today. I only got $5, but hey, it's $5. ($500 would have been so awesome, but I'm not complaining.) So I went and bought this hitch lock that I've been wanting to get. Formerly, there was just a bolt stuck through it. If someone had wanted to, they could have just hitched the whole trailer up and driven it away.

trailer hitch lock

This is an old picture, but you may recall that there was no key for the door. I'm not sure I ever mentioned that I was able to get it re-keyed for a very reasonable price. This was done long ago. Let's be honest, if someone wanted to break into one of these trailers it's super easy, but at least if they did, I could honestly tell the insurance company that it was locked.

trailer door latch and lock

And then I put those keys on my primary key ring, and also with my spare car key. When Marie and I travel we always make sure we each have a set of both vehicle keys. So that's all set to go.


keys on a key ring

I fooled around a little bit inside, just sorting and packing things that we'll need to have with us on the trip- the kitchen box, the extension cord, stuff like that. I tacked the wires up out of the way and screwed the front reflectors back in place (temporary until that part of the trailer is painted).

In other news: I wrote in the morning, and worked on projects in the afternoon that can't be pictured. I have 3 presentations (one longish, two short) that I have to have ready for before Tuesday. A good productive day.

See Trail Work Day
if you like this blog, click

Like This!


Friday, April 26, 2019

Springy

 
Even though the wind was cold today, the sun was shining and the flowers are starting to think it's spring. Notice that the grass has greened up, too.

Lovely little patches of violets.

violets

One of my bi-colored double daffodils opened.

double daffodil

And here's a surprise... A 40-plus-year-old hyacinth bulb decided to pop up and bloom. It doesn't look plump and happy, but it seriously has to be that old. My mother gave me these when I was trying to create a flower bed from nothing.

hyacinth

Not much news: I wrote in the morning, walked to the library and worked in my office for the afternoon. Tomorrow I must get busy on a couple of projects that have to be done before the conference. I thought about taking a hike on the NCT, but I'm trying to be really frugal right now and didn't want to spend the gas money.

See Spring at Shagway
if you like this blog, click

Like This!


Thursday, April 25, 2019

Spring at Shagway

 
Today was another work day at Shagway Arts Barn. The barn is not going to have a regular arts store this season. Too much work, not enough volunteers, basically. But there will be live music, vendor events, and it's always available to rent. There are short, dog-friendly trails that can be walked any time.

We are cleaning, getting rid of a lot of display rack type "furniture," etc. I went out to work on the trails. Am going to make a little map for people to use.

The entrance was cheery with Glory of the Snow (Chinodoxa) blooming among the rocks.

Chinodoxa Glory of the Snow

How about a closer look? They are one of my favorites, with such a clear blue.

Chinodoxa Glory of the Snow

This pond is just down the road. Mr. & Mrs. Mallard seemed to be looking for a nest site.

pair of mallard ducks in small pond

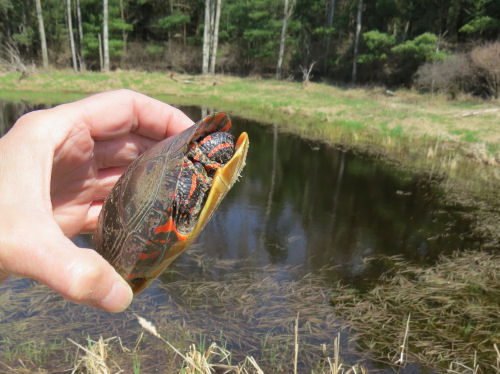
And this is the first turtle of the year, and the first turtle rescue of the year. A painted turtle, too scared to take a peek. But s/he's now off the pavement. Kind of a little one. Nice to see it.

painted turtle

In other news: I worked on North Country Quest in the morning, and on the Shagway Trail Map when I got home. Not much else to report.

See Wildlife of the Day
See First Turtle, First Rescue 2017
if you like this blog, click

Like This!


Wednesday, April 24, 2019

Spring for a Birthday

 
Today was a beautiful day, and although I did not go for a hike, I did do exactly what I wanted for my birthday.

The one pasqueflower that keeps on surviving bloomed for me,

pasqueflower

as did the first of the daffodils.

daffodils

I worked on my next chapter in the morning, and spent most of the afternoon doing the last things to get the trailer ready for a (not finished but useable) road trip.

1985 Companion travel trailer

That included

1. re-connecting the wires for all the lights. I had numbered each end, so that was just a matter of hooking them back together and then checking to be sure they all worked. They did.

2. getting the tires up to pressure. I have a tiny compressor that works, but it's slow.

3. the thing I actually did first, and was most important, bracing the interior. This trailer had most of the internal structure removed before I bought it. I took out almost all the rest, certainly everything in the front half where the door is. These trailers are really flexible. I already knew that I could have problems with the door popping open while towing it because it has done it before. I'd jury-rigged the door latch, but now I knew there could be a problem. Besides, you don't want it flexing like crazy while it's being towed.

The big issue here is that this is going to be a fussy and tricky job to build in what is going to be my primary structural support. I just didn't think there was going to be time before next Wednesday, and I need to buy another tool to do it. I came up with an easy temporary solution.

There are still a few 2x2s fiberglassed to the walls. I used a rope between a couple of nails to pull the sides inward (2 inches just with reasonable hand pressure), and temporarily bolted a board across the space. Obviously this will be in the way while we are using the inside, but it's easy to pull out and then reinstall for the drive home.

temporary internal brace in Companion travel trailer

4. Take it for a test drive. I just went around a big country block and stopped to visit with a friend I haven't had time with for quite a while on the way. That was a lot of fun. She's an April birthday too, so we have often "celebrated" over a kitchen table together.

5. When I got home I wanted to finish one more job today because it was warm. I got an extra narrow strip of butyl caulking all the way around every window. I got better at it, to the point where some of it actually looks decent.

Now I have to turn my primary attention to completing some other things that have to be done before we take the trailer to the North Country Trail Celebration next week. If anything else happens on the trailer in the next few days it will be to do a bit more fiberglassing to continue some of the repairs to the shell, and a couple of temporary interior tweaks to make it more convenient as a camper. Like a place to clamp my clamp-on light, for example.

Well, it was one year ago that I quit my job and said I was going to focus on writing. I think I've done fairly well at that, for me, Ms. Lack-of-Focus. I'm behind on the date I hoped to have North Country Quest done, but that was way too ambitious a goal. I'm writing almost every day. I'm selling fewer books that I would like, but not too shabby. I have a semi-clean spot in my office (although the dining room is trashed as a sorting space). I'm back on track with working on the trailer.

My health is still really great, and I'm not anticipating any major problems in the near future, but none of us is getting any younger, and I'd like to get the trailer on the road while I'm in good enough shape to enjoy it.

Thanks for the birthday wishes! And I had cake last night at writers' group (and brought some home for today), and Omer bought me some potato chips (a real treat). So I ate too much, and completed something I really wanted to accomplish before the end of the month, and saw a friend. Life is good.

See Not A Day Over Seventy
See Original Interior
if you like this blog, click

Like This!


Tuesday, April 23, 2019

My Trailer Redo - Day 73 - Installing the Windows

 
I actually got the windows all back in before the first test in last night's rain. It rained hard, and I am amazed to be able to tell you that only one window has a small leak, and I think that can be easily remedied.

reinstalled windows in Companion fiberglass trailer

Here are the supplies I used to put them back in, sort of. You definitely need butyl sealing tape/putty whatever you want to call it. It comes in a rolled up flat strip with paper on one side. (I am sorry to tell you that I ended up with one roll of black and one white. All white would have been better, but I am making it work.) I bought enough stainless steel screws to replace all the ones that were regular steel. They are just pan head, size 10. I also bought this foam insulating tape thinking I'd use it in the way some previous owner had along the screw channels. More on that later.

supplies to reinstall aluminum windows in Companion fiberglass trailer

When I took the old butyl off the windows I learned that there were two layers on both the tops and bottoms. I checked how much I had purchased, and there was enough, so I repeated that application.

Make sure you know which window goes in which hole before you put the sealer on. The likelihood that the screw holes will match up interchangeably is zero, and once you put the window in with the putty in place you don't want to have to move it.

You want to put the butyl strips on in a certain configuration. The top strip should go all the way across. The sides should extend from that down to the bottom of the frame, and the bottom piece is between the two side strips. This minimizes the easy places for water to channel.

diagram for placement of buytl sealer strips on trailer windows

The butyl is weird stuff. It's a lot like working with cool but flexible tar. You don't want to let it touch anything except where you want it because it sticks instantly. Especially, don't let it touch itself, or you'll never get it separated. Don't pull it off the backing paper. Just run the strip with the backing paper along the place you want to put it, and peel the backing paper when you are ready to put it in the frame. I got somewhat better at this by the third window.

Remember to slip the bottom of the window in the opening first so you don't break off the knob.

After I got the windows in and screwed in place, this was the situation along the edges. The butyl hadn't pushed all the way out to the edge of the frame. I figured this was a perfect way for water to get in and cause leaks.

reinstalled windows in Companion fiberglass trailer with gap in putty

So, what I did was to cut a short enough strip of butyl to handle easily, about 8 inches. Then while it was still on the backing paper, I cut it in thirds the long way. That was a perfect size to run along the edge of the frame. Where there was a deeper void, I used another little piece and filled behind it. Then I could use my finger to form the butyl and make sure it was tight against the trailer and the frame.

butyl seal on reinstalled windows in Companion fiberglass trailer

I wasn't liking that it didn't look nice and smooth like glazing compound on a window that you can form with a tool, but you know what? You can't tell at all if you aren't staring right at the edge of the window.

reinstalled windows in Companion fiberglass trailer

I ran out of energy before I got all the way around all four windows to finish them this way, but I did all the top edges. I think the one window that leaked a little is from one of the sides. Anyway, on the next warm day, I'll finish going all the way around.

So, the original aluminum windows are back in my 1985 Companion Travel Trailer.

And that foam tape? I put a strip of it under the screws on one window. It twisted with the screws and just looks ugly, and probably isn't doing much. On another window, I put a strip of it over the screws. That might be OK. I have been told there are actually covers you can buy for those screw channels, but I haven't found them yet.

So this work was actually done yesterday. Today, I spent 3 hours ripping out the last of the copper tubing and piping that was associated with the propane I'm not using, then cleaning out the inside and putting it back together enough so we can use it next week.

In other news: I wrote in the morning, had bell choir and then writers' group tonight. Busy day!

See
Index for Trailer Refurbish
Cleaning Window Frames
if you like this blog, click

Like This!


Monday, April 22, 2019

My Trailer Redo - Days 71,72- Cleaning Windows

 
This is going to be a long post. There's no way around it, this was a long job. It was not very rewarding except for the fact that it saved a lot of money. I decided I couldn't afford replacement windows, so I cleaned and refurbished the old square aluminum frame ones. These are the kind of windows that have a turn knob at the bottom that ratchets out a double bracket and pushes the window pane out at an angle. One real advantage of this kind is that you can have them open in the rain.

Let me be clear. My intention was not to make these windows look somehow like chrome. I just wanted to get all the old gunk off them, clean the years of dirt off, do necessary repairs, and hopefully not damage them in the process of trying to fix them.

This is the blow by blow of what I did, in case you have found this post and want to do it too. I've seen nothing else on this topic.

First of all, when you are removing the windows from the trailer, it's better to pull the top out first and then you can lift the window enough so you don't catch the knob on the window opening and break it. I broke one. The good news is they are easily available and simple to replace.

Second, I learned (while doing the third window- good grief) that these come apart making the job much easier! The two parts slide along the top hinge and can be separated very easily.

taking the two halves of an aluminum trailer window apart

Here are most of the tools I used: screwdrivers, putty knife, box cutter, toothbrush, small wire brush, needle-nosed pliers, razor blade.

Solvents: lacquer thinner, mineral spirits, acetone, vinegar

Other: white lithium grease, Mother's aluminum polish, cheap paper towels, rags, stick-on screen patches (and one other item discussed at the end)

materials and tools to clean aluminum trailer windows

ISSUE 1- screens

a. The first question was whether I needed to replace any of the screens. I was thinking about it, but then I realized that the base plate for the knob is riveted through the screen. Ugh. The only real damage to the screens was two tiny holes, which I covered with stick-on screen patch.

plate riveting through screen on aluminum trailer window

b. In several places, the screen had been pulled out of the channel, probably when something got pushed against it. But when I pulled it tight and put the spline back in the groove it was fine. Note- this is very narrow spline which was not available at Lowes. I ended up replacing a short section with some twine, which should be fine. I wasn't going to order a roll of it for six inches.

screen pulled loose on edge of aluminum trailer window

c. General cleaning- this is plastic screening, and I just gave it a good brushing and a wipe.

ISSUE 2- cleaning off the gunk (foam insulating tape, butyl, silicone). Overall tip- remove as much as possible mechanically. The solvent will only deal with the last bit of residue

a. Whoever last did these windows ran a strip of foam insulation tape in the channel where the screws go. This was a beast to remove. I scraped lots of it out with a screwdriver. This picture shows a large screwdriver, but it turned out that a small one worked best to get into the recesses of the channel. The only solvent that even remotely removed the adhesive residue was lacquer thinner.

cleaning the screw channel on an aluminum trailer windows

b. The old butyl tape pulled off pretty cleanly without tools, although giving the area a final scrape with the putty knife is a good idea. Mineral spirits removes the last of the residue.

old butyl sealant coming off aluminum trailer windows

c. These windows had been sealed around the outer edges with silicone. Not a good choice on fiberglass anyway, and now I had to remove it. It was a dog. Scrape as much as you can. The putty knife and box cutter and wire brush worked best. The final bits will come off with mineral spirits if you let it sit for a few minutes and then scrape or brush again. P.S. It rolls into little pills with either static electricity or enough gumminess to stick to everything. Curses on anyone who uses silicone on these trailers!

silicone residue on aluminum trailer windows

ISSUE 3- general cleaning- This doesn't really need a picture. There was a lot of years of dirt in everything. The channels that hold the brackets to open and close the windows were full of gunk and dead bugs. There were spider nests and dirt and grass chaff along the top edges. Brush, wipe, vaccum... whatever it takes to clean this stuff out.

ISSUE 4- the gears for the window opening mechanism.

a. As you can see they are badly corroded. Must be some non-aluminum parts in there. Everything worked, but not smoothly.
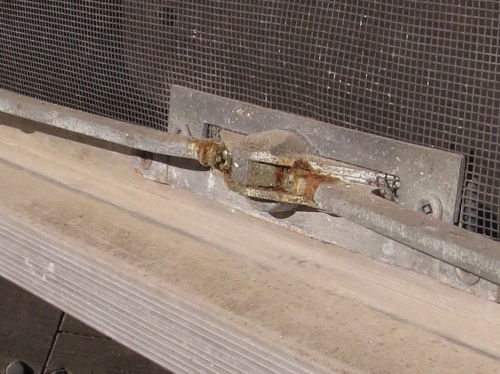
rusty gears on aluminum trailer window mechanism

b. I sprayed them with white lithium grease and worked them a few times, then wiped off the excess. This is before wiping.

gear on aluminum trailer windows

ISSUE 5- clean the aluminum

a. There was some staining around screw holes where ordinary steel screws had been used. This came off with the wire brush (and I bought all stainless steel screws to re-install the windows)

b. I used Mother's Mag and Aluminum Polish because I was able to get it locally, and it wasn't too expensive. It doesn't really need a picture. Use a clean soft rag (I cut up an old terrycloth towel). Wipe on some of the polish and rub. Black tarnish will begin to come off of the aluminum. Keep rubbing until no more black comes off. It only takes a couple of years. The polish claims that it provides a protective coat. I did not work hard to make these gleam like chrome. In fact, I'm pretty sure I didn't do as good a job on window four as I did on window one.

ISSUE 6- clean the glass.

a. Scrape off any old decals or whatever with the razor blade, and acetone takes off the adhesive.

b. Wash the glass. I used vinegar and paper towels

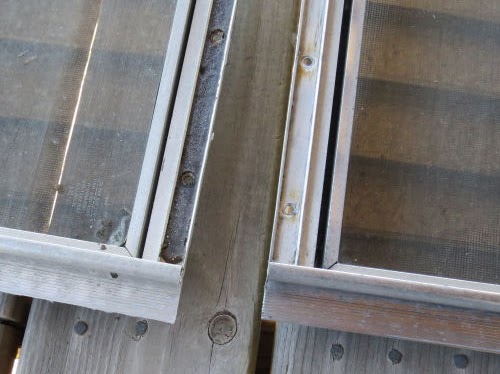
Here is a cleaned window and frame on the right, and a dirty one on the left.

aluminum trailer windows

A close up of the corners side by side. If you can't see any difference, don't tell me.
 aluminum trailer windows

Now, there's one more thing to talk about, and it's a really important one.

ISSUE 7- rollers at the end of the opening brackets. These come from the factory with nylon roller wheels that sit in the channel at the bottom of the window. These allow those brackets to slide smoothly as the knob is turned to open and close the windows. But the nylon rollers have disintegrated. You can see that this one is broken. They were all broken. I easily broke them off completely with the needle-nosed pliers.

bracket arm of aluminum trailer windows

But there has to be something to hold those arms in the channel. You can push the window open if the arms aren't held in place, but you can't pull the window closed. Also, the window can be caught by a breeze and lifted if the arms aren't constrained in the channels.

What to do!? The parts are all riveted, and they are also kind of wimpy. I could envision lots of broken or bent pieces if I started messing with taking them apart. I went hunting for a way to replace the nylon roller with something that I could get over the head of the rivet, but would still lock into the channel. The answer is a 7/16 O-ring with a wide circumference.

The closest I could find locally was some rubber wire grommets, but the idea does work, although these are a little thick. The 1/2 inch ones were too big. They fit, but got chewed up when I opened the window.

O rings

I've ordered some actual O-rings in a couple of sizes, and when they come and I see which one works best I'll add it here with the source. I did NOT have to order 500 of each just to get 8.

O rings to replace nylon rollers on aluminum trailer windows

I was able to snap this back into the channel and it works OK. As I said, it's a little thick, so I'm just being a little careful when I open and close the window so it doesn't catch and bend the arm.


Edited 2020- these did not work. See the current solution at Window Bracket Rollers
So, that's the low down on how this project went. It took over 2 hours to do each window, and I was pretty sick of it all before I finished. But it worked.

In fact, the windows are back in the trailer. It's supposed to rain tonight, so that will be the first test. Tomorrow, I'll talk about the installation.

Worked 5.5 hours today.

See
Index for Trailer Refurbish
Trim Loc
if you like this blog, click

Like This!