This is going to be a long post. There's no way around it, this was a long job. It was not very rewarding except for the fact that it saved a lot of money. I decided I couldn't afford replacement windows, so I cleaned and refurbished the old square aluminum frame ones. These are the kind of windows that have a turn knob at the bottom that ratchets out a double bracket and pushes the window pane out at an angle. One real advantage of this kind is that you can have them open in the rain.
Let me be clear. My intention was not to make these windows look somehow like chrome. I just wanted to get all the old gunk off them, clean the years of dirt off, do necessary repairs, and hopefully not damage them in the process of trying to fix them.
This is the blow by blow of what I did, in case you have found this post and want to do it too. I've seen nothing else on this topic.
First of all, when you are removing the windows from the trailer, it's better to pull the top out first and then you can lift the window enough so you don't catch the knob on the window opening and break it. I broke one. The good news is they are easily available and simple to replace.
Second, I learned (while doing the third window- good grief) that these come apart making the job much easier! The two parts slide along the top hinge and can be separated very easily.

Here are most of the tools I used: screwdrivers, putty knife, box cutter, toothbrush, small wire brush, needle-nosed pliers, razor blade.
Solvents: lacquer thinner, mineral spirits, acetone, vinegar
Other: white lithium grease, Mother's aluminum polish, cheap paper towels, rags, stick-on screen patches (and one other item discussed at the end)

ISSUE 1- screens
a. The first question was whether I needed to replace any of the screens. I was thinking about it, but then I realized that the base plate for the knob is riveted through the screen. Ugh. The only real damage to the screens was two tiny holes, which I covered with stick-on screen patch.

b. In several places, the screen had been pulled out of the channel, probably when something got pushed against it. But when I pulled it tight and put the spline back in the groove it was fine. Note- this is very narrow spline which was not available at Lowes. I ended up replacing a short section with some twine, which should be fine. I wasn't going to order a roll of it for six inches.

c. General cleaning- this is plastic screening, and I just gave it a good brushing and a wipe.
ISSUE 2- cleaning off the gunk (foam insulating tape, butyl, silicone). Overall tip- remove as much as possible mechanically. The solvent will only deal with the last bit of residue
a. Whoever last did these windows ran a strip of foam insulation tape in the channel where the screws go. This was a beast to remove. I scraped lots of it out with a screwdriver. This picture shows a large screwdriver, but it turned out that a small one worked best to get into the recesses of the channel. The only solvent that even remotely removed the adhesive residue was lacquer thinner.

b. The old butyl tape pulled off pretty cleanly without tools, although giving the area a final scrape with the putty knife is a good idea. Mineral spirits removes the last of the residue.

c. These windows had been sealed around the outer edges with silicone. Not a good choice on fiberglass anyway, and now I had to remove it. It was a dog. Scrape as much as you can. The putty knife and box cutter and wire brush worked best. The final bits will come off with mineral spirits if you let it sit for a few minutes and then scrape or brush again. P.S. It rolls into little pills with either static electricity or enough gumminess to stick to everything. Curses on anyone who uses silicone on these trailers!

ISSUE 3- general cleaning- This doesn't really need a picture. There was a lot of years of dirt in everything. The channels that hold the brackets to open and close the windows were full of gunk and dead bugs. There were spider nests and dirt and grass chaff along the top edges. Brush, wipe, vaccum... whatever it takes to clean this stuff out.
ISSUE 4- the gears for the window opening mechanism.
a. As you can see they are badly corroded. Must be some non-aluminum parts in there. Everything worked, but not smoothly.
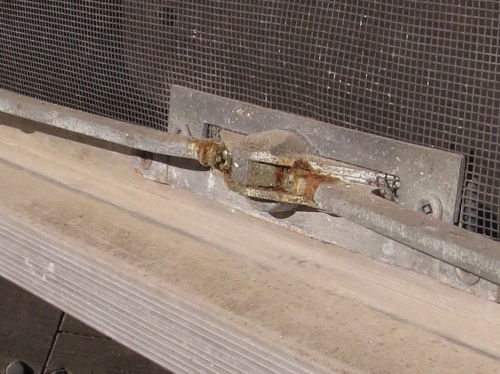
b. I sprayed them with white lithium grease and worked them a few times, then wiped off the excess. This is before wiping.

ISSUE 5- clean the aluminum
a. There was some staining around screw holes where ordinary steel screws had been used. This came off with the wire brush (and I bought all stainless steel screws to re-install the windows)
b. I used Mother's Mag and Aluminum Polish because I was able to get it locally, and it wasn't too expensive. It doesn't really need a picture. Use a clean soft rag (I cut up an old terrycloth towel). Wipe on some of the polish and rub. Black tarnish will begin to come off of the aluminum. Keep rubbing until no more black comes off. It only takes a couple of years. The polish claims that it provides a protective coat. I did not work hard to make these gleam like chrome. In fact, I'm pretty sure I didn't do as good a job on window four as I did on window one.
ISSUE 6- clean the glass.
a. Scrape off any old decals or whatever with the razor blade, and acetone takes off the adhesive.
b. Wash the glass. I used vinegar and paper towels
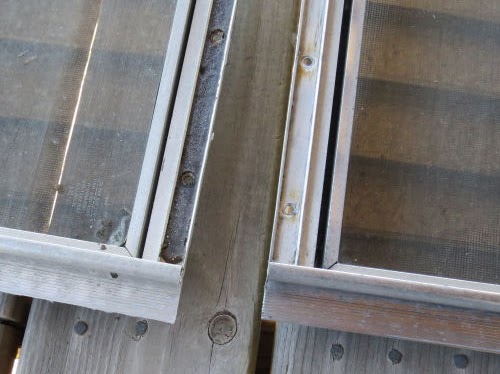
Here is a cleaned window and frame on the right, and a dirty one on the left.

A close up of the corners side by side. If you can't see any difference, don't tell me.
Now, there's one more thing to talk about, and it's a really important one.
ISSUE 7- rollers at the end of the opening brackets. These come from the factory with nylon roller wheels that sit in the channel at the bottom of the window. These allow those brackets to slide smoothly as the knob is turned to open and close the windows. But the nylon rollers have disintegrated. You can see that this one is broken. They were all broken. I easily broke them off completely with the needle-nosed pliers.

But there has to be something to hold those arms in the channel. You can push the window open if the arms aren't held in place, but you can't pull the window closed. Also, the window can be caught by a breeze and lifted if the arms aren't constrained in the channels.
What to do!? The parts are all riveted, and they are also kind of wimpy. I could envision lots of broken or bent pieces if I started messing with taking them apart. I went hunting for a way to replace the nylon roller with something that I could get over the head of the rivet, but would still lock into the channel. The answer is a 7/16 O-ring with a wide circumference.
The closest I could find locally was some rubber wire grommets, but the idea does work, although these are a little thick. The 1/2 inch ones were too big. They fit, but got chewed up when I opened the window.

I've ordered some actual O-rings in a couple of sizes, and when they come and I see which one works best I'll add it here with the source. I did NOT have to order 500 of each just to get 8.

I was able to snap this back into the channel and it works OK. As I said, it's a little thick, so I'm just being a little careful when I open and close the window so it doesn't catch and bend the arm.
Edited 2020- these did not work. See the current solution at Window Bracket Rollers
So, that's the low down on how this project went. It took over 2 hours to do each window, and I was pretty sick of it all before I finished. But it worked.
In fact, the windows are back in the trailer. It's supposed to rain tonight, so that will be the first test. Tomorrow, I'll talk about the installation.
Worked 5.5 hours today.
 | See Index for Trailer Refurbish Trim Loc |
| if you like this blog, click
| |
1 comment:
WOW, there was a lot involved in cleaning those windows.
Post a Comment