Entries to Win Afghan

Sign up to receive the Books Leaving Footprints Newsletter. Comes out occasionally. No spam. No list swapping. Just email me! jhyshark@gmail.com Previous gifts include a short story, a poem, and coupons. Add your name, and don't miss out!

Sunday, October 31, 2021

56 Main Meals Packaged

  I DO get to cross off one big item today, even though it was too rainy to work on the trailer. I have all the backpacking meals for the primary meal of the day packaged and done. (All the rest of the food is one item to cross off- need to keep plugging!)

First, let's talk about why 56. Remember, this is going to be a mostly supported hike, which means I won't have to prep and carry dehydrated food most of the time. When I first made out a master plan for the hike, I tried to maximize the number of nights I could backpack (finding legal places to camp that were the right distance apart). That number was 92. But, realistically, I'm sure I'll let the support person pick me up whenever there is a convenient road crossing.

That said, there are portions of the trail where there aren't many road crossings. So, without a lot of agonizing over every potential pickup spot, I cut the number of likely backpacking days to 56. 56 out of 365 doesn't seem like too much. But, it's a lot of food preparation- about as much as the two-week hike for 4 people back in 2009. (See 77 Pounds of Food).

And, why am I doing all this work? Because I've become quite a food snob. I can't stand most of the purchased backpacker meals, and they are quite expensive.

If you've been following me a while, you know that I'm usually very picky about weighing and labeling everything. For this trip, I've hugely relaxed my standards. I am fixing meals only for myself. I don't have to impress or please anyone else. Also, the 56 days will not be continuous. Mostly they are 4-6 day stretches at a time and then with a trailer break for a while.

Here are the 56 main meals, lined up in two tubs. backpacker meals

One other major change from my norm. These meals are all "cold soak" meals. That means I won't carry a stove. None of my food will require heat (yeah, that means cold instant coffee for breakfast- I'll live).

And I'm not going for variety. I picked four menus that will rehydrate with no heat. I packaged up 14 of each. I'm not even weighing them. I've had so much experience at this, I know they are one serving each. When I do load up the backpack... say for four days on the trail without seeing the support person, I'll take one of each of the four main meals, and ditto with the necessary light meals, breakfasts, and snacks. No muss, no fuss.

Here is one of each of the four main menus- Each packet has a main dish and a dessert or other treat included. Clockwise from top left: spaghetti, cous cous, Southwestern salad, and "All Tuckered In." packets of backpacking meals

The spaghetti is straightforward. I rationed angel hair pasta; I dried bottled sauce; I dried hamburger. Packaged the three together. Rehydrates in about 3 hours, so I'll need to put water on it at lunchtime or at the latest mid-afternoon.

The Southwestern salad is a brand new recipe for my backpacking collection. I saw it on line, and thought it would be really good. So I made a couple of servings. Yummers and very filling. Then I dehydrated a serving, and rehydrated it without heating. It came back nearly perfectly with very little loss of texture. Only took a couple of hours to rehydrate. Winner and winner! Here's the tub of 14 servings ready to go in the dehydrator. Carbohydrate is barley. southwestern salad

"All Tuckered In" is my made up name for a recipe we've used for years that is really good. It got itself on my list for this trip sort of as an afterthought. I was going to do flavored instant mashed potatoes. These are really easy, and lightweight. I tried making these cold. Meh... they were edible, but the texture was nasty and I thought there had to be something better. Then I remembered this menu and thought it would all rehydrate cold. It's just apple slices, sweet potato slices, onion, dried ground sausage, and seasonings. So, again, I had to make up a couple of servings, dehydrate them, and then make sure they would rehydrate without heat. Well! This one works very nicely and tastes quite yummy cold. Rehydrates in about two hours.

The fourth one is an old standard of ours that we usually eat as a lunch salad. I just made the portion larger, and it became a main meal. This is cous cous, with vegetables and dried salami. The real hassle with this menu is packing the oil and spices dressing. I have a couple of small bottles that actually don't leak (believe me, we've tried many kinds), but I don't have 14 of them. So, I know this works, but it's a pain to package. I put the dressing in a small ziplock and then sealed each one in a vacuum pack. These will not leak. The biggest drawback is that you have to get out your sharp knife to puncture the vacuum bags to open them. Rehydrates in 15 minutes.

Here are all the things that go in the cous cous just as they went in the dehydrator. Top to bottom are: mushrooms, cucumber, salami, green onion, black olives. foods in a dehydrator

Packaged with each main dish is some other treat. Tootsie rolls, a granola bar, trail mix, fruit mix, gorp, etc. I mixed these up so I don't always get the same treat with the same main dish.

If we are getting close to the end of the hike and I have backpacking meals left over, we can just eat them in the trailer. I think this hike might get the need to backpack out of my system for a while. I told Marie this, and she said, "ha!" But anyway... I don't want to bring a lot of food packets home.

And I'm well into other food prep. Actually, except for a little bit of accounting bookwork this morning, I concentrated hard on food today. I got all the meals and snacks planned. I did another major shopping trip for food ingredients. The dehydrator is loaded up for overnight.

28 BIG ITEMS to do (34 done) and 24 small ones to do (14 done). 30 days to go. And, just like that... tomorrow I'll be into the final month. Gotta keep up the level of productivity!

See Hike Food Knobstone Trail

Saturday, October 30, 2021

My Trailer Redo - Days 167-173 - Kitchen Countertop

  I definitely get to cross a big item off today. Doing the kitchen countertop was a completely separate entry from the trailer kitchen, because it's such a big project all by itself. acrylic pour countertop in trailer kitchen

First, I had to cut the board the right shape. That wasn't too difficult, since there was a "junk" board covered with contact paper that we'd been using already. The shape just needed a few tweaks, although it was in two pieces, and then I could use it for the pattern. It got painted white on both sides first. Oh, I filled holes on the right side with plastic wood. This is the back, so I wasn't as picky. building trailer kitchen countertop

There were multiple rounds of dry-fitting everything, because of some additional changes I'm making to the final iteration. building trailer kitchen countertop

I did the acrylic pour, the same as I did with the table. But I learned some things. I used less paint and let it run more. The link to the explanation of how I did the pour with the table top is at the end. I am quite satisfied with the result this time. acrylic pour trailer kitchen countertop

But then-- I was facing that issue with the resin leaving such big dimples. I watched some more videos, one of them addressing this exact issue. First of all, I washed the whole thing with soap and water after the paint was good and dry. I put duct tape around the edges to keep so much resin from running off the sides (the video I watched had good luck with that. The tape didn't stick very well for me). resin pour trailer kitchen countertop

My plan was to do thinner layers this time. First layer left many of those bare spots just like before. For some reason, the resin just flies away from certain spots. It has nothing to do with how much resin is applied. resin pour trailer kitchen countertop

But, the video also said that the way to fix that was with the thinner layers, and to rough the surface up significantly between layers. Don't worry about all the scratches- the new coat will bond and remove them all. This also means you have to let the resin dry for at least 12 hours between coats. So I sanded it with coarse paper, then washed with a damp cloth. Then the last thing is to wipe the entire surface down with alcohol. resin over acrylic pour trailer kitchen countertop

So, I did three coats. There are a few uneven places, but no dimples anything like the table top. I have a little bit of resin left, so I'm going to try to fix the table before I leave. The resin doesn't store well after opening, so I'll be better off to use it up. And it's expensive, so I don't want to waste any.

It looks pretty darn good! resin over acrylic pour trailer kitchen countertop

Today, I put it in the trailer. All the lower elements of the kitchen are fastened in. Ready to start above the counter! (Oh, OK, I have to do one little shelf brace piece that I forgot to polyurethane.) resin over acrylic pour trailer kitchen countertop

P.S. We are glad to get it out of the kitchen. Definitely a monster to work around. (Anyone want to give me a pole barn?)

In other news: I got a LOT done today. I worked on hike food, I did major shopping for hike food, and I got the trailer to this point. 29 BIG ITEMS to do (33 done) and 24 small ones to do (14 done). 31 days to go.

See New Table
See Lower Front Wall

Friday, October 29, 2021

Swingin' In the Rain

  Today, Cathy and I hiked 9 miles on the North Country Trail in some moderate drizzle. It really wasn't bad at all. But it was gray enough that what little color is in the trees didn't really show to good effect. We weren't singin', but maybe we were walking fast enough to call it swingin' autumn woods

This was the best find of the day. I'm not sure I've ever seen such a pretty toad. It's legs are camouflage, and its body is brown. Believe me, it was really hard to see in the leaves. toad

Where we hiked, there is a small area of prairie, and here are the seedheads of Showy Goldenrod.
showy goldenrod seedheads


The moss was bright green, and a few leaves also had bright colors red leaf on green moss

And, just because I rarely do this, I'll show you the spore print from yesterdays Butter-foot Bolete. I always hate to collect mushrooms in the wild because I want other people to enjoy them. But this was in my yard. Yellow-brown to olive brown... so that probably confirms the ID. butter foot bolete spore print

My NCT miles for 2021 are at 414. Cathy has 78.5 towards Hike 100.

North Country Trail, Lake County, Bowman Lake TH south 4.5 miles and back.

In other news: I worked on trail food. I worked on another hike project, and finished one book-promotion related project. I get to cross off a big thing! Probably one more tomorrow, too. I still have one thing to do this evening. 30 BIG ITEMS to do (32 done) and 24 small ones to do (14 done). 32 days to go.

See Putin' In Some Miles

Thursday, October 28, 2021

Butter-Foot Bolete

  Another new-to-me mushroom that has popped up all over my yard this week. I'm pretty sure this is Boletus auripes, the butter-foot bolete. I'm showing you the underside of the cap first, so you can see the pores. The pores, instead of gills, is what tells me it's a bolete. butter-foot bolete

These can get bigger, but the ones in my yard are hunkered down in the grass. I noticed them while hunting for a clothespin that the wind catching a sheet like a sail had sent soaring many feet away. Here's what they look like in the grass. The tops sometimes become brown. butter-foot bolete butter-foot bolete

When you break the cap the color is yellow clear through, and the bruised flesh doesn't stain any other color. butter-foot bolete

The stem can be reticulated- netted or broken into a patchwork design. A giraffe's spots are reticulated. So, I think that's a yes. butter-foot bolete

I only found one other yellow bolete in the guides, and it has one of those fat stems, so it's not a good match for these. That's two new boletes in my yard this summer!

In other news: I was having a tired day today, but that doesn't mean I can rest. It only means I get to work while tired. Laundry, trail food, of course another trip to stores and errands, worked on the trailer (and already need something else that I didn't get today). I did parts of many projects, but can you believe I don't get to cross off a single thing? Grrr. But I may finish one yet tonight. All too often, I get to a place on a particular job that has to wait for X, or to let Y dry, or requires person Z to respond... so I can't continue until that piece is complete. If I finish something tonight, I'll get to count it for tomorrow. Can I make myself do some more things this evening? 31 BIG ITEMS to do (31 done) and 24 small ones to do (14 done). 33 days to go.

See Bicolor Bolete

Wednesday, October 27, 2021

Finding Ada

  You might remember that two years ago I spent some time in the Lakeview Cemetery in my home town and tracked down some gravestones from biological family members. I also mentioned that my father's bio mother was supposed to be buried in her family's plot, but there was no marker. My dad had told me once that she was there, but I was too young to remember where he showed me.

This is Ada E. Hall Walker, age at time of picture unknown, but I'm guessing late teens. It's the only known picture of her that exists.
Ada Hall Walker


So, this month, the Interlaken Historical Society presented a program called "Name that Ghost" where they hoped to solve a few mysteries associated with the cemetery. I semi-jokingly said that if they found Ada's ghost walking around, they should ask her where she is buried.

Well! Diane Bassette Nelson, whom I do remember from childhood, is now the person in charge of all this info and research. She took on the challenge despite the fact that I knew almost nothing about Ada. Two years ago, I managed to determine that Ada's mother was Augusta Claudine Rappleye Hall. I speculated that she was born between 1882 and 1884 because dad was born in 1904. And I knew that she died rather young, but I had no other information.

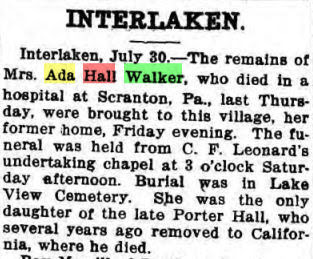
Diane found Ada! We now know that she was born in January 1883, and died in a hospital in Scranton, PA, July 26, 1917. Perhaps she had tuberculosis, but the article does not say. Her father was Porter C. Hall. She died four days after Dad turned 13. I wonder if he was told of her death at the time.
obituary Ada Hall Walker


And she is buried right beside her mother. The cemetery placed a laminated paper marker there temporarily. cemetery

There is no one left who really cares about any of this since I'm the end of this biological line. But someohow, I feel that this has provided some closure for my dad. He was four years old when he was given up for adoption, so he had to have remembered Ada. And he cared enough to try to show me where she was. Perhaps after I finish this hike, I can get a basic headstone placed for her.

In other news, I created a Books Leaving Footprints newsletter this morning and worked on trail food. In the afternoon, I worked on the trailer and then Cathy came by, and we did some errands, including buying me a new mattress! Perhaps no more morning backaches from a worn-out mattress. That would be awesome. I crossed off one BIG ITEM and 3 small ones, but I added more small ones. 31 BIG ITEMS to do (31 done)-- so am I at the tipping point and it's all downhill from here?-- and 24 small ones (14 done) to do. 34 days to go. I know there will be a ton more small items added as the date approaches.

See More Family

Tuesday, October 26, 2021

My Trailer Redo - Days 164-166 - Lower Front Wall

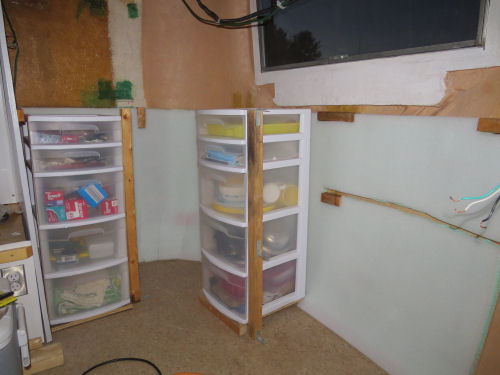
  The lower front wall (under the kitchen counter) is essentially finished. The upright supports and the drawer units are not fastened in yet, but I can't do that until I put the countertop in place. But everything is fitted and ready. storage in a fiberglass trailer

This all had to start with cutting some old junk off the front walls and adding, of course, more braces. fiberglass trailer wall

Then I had to do the bottom layer of foam insulation. This is turning out to be very tedious and slow. This might be the most difficult section, and that would be good news to have it done. insulating a fiberglass trailer wall

I had to figure out how wide a strip of the styrofoam I could use that would still lie fairly flush to the wall. Then to conform it to the inward curves, I cut the foam almost all the way through, and carefully snapped it so that the "skin" stayed intact. Then I glued along the edges. insulating a fiberglass trailer wall insulating a fiberglass trailer wall

Finally, this whole section was complete with the first layer. That open stripe on the right is where a shelf fits in. The blocks along the top edge are supports for the countertop. insulating a fiberglass trailer wall

Then I had to cut a piece of the white foam to fit. I did have to make some V-cuts along the bottom edge of this one to get it to fit. It's not quite 100% perfect, but it's not bad. There will probably ultimately be another layer of something over this foam, but I'm trying to get it as smooth as possible. insulating a fiberglass trailer wall

You can see the cuts. I didn't get them as straight as I would have liked, but the joints are tight. insulating a fiberglass trailer

And again, here's most of it waiting for the countertop. The afore-mentioned shelf is complete, but I couldn't balance it in there for the picture without more pieces of the puzzle. Also, notice there are bases under the drawer units. Those have custom shapes on the bottom so that the drawers will sit level. storage in a fiberglass trailer

It's hard to figure how to count the time spent on each segment, but I'm calling this three days worth.

In other news: This morning I worked on hike food and did bookkeeping for the author business. I got enough of that done that I can cross off one big item. Worked on the trailer in the afternoon, did more of the never-ending errands, and went to bell choir practice. That leaves 32 BIG ITEMS to do (30 done) and 25 small ones (11 done) to do. 35 days to go.

See Day 163- Trim

Monday, October 25, 2021

Scenes from Clue

  On Saturday I went to the production of the play, Clue, at West Shore Community College. Everyone did a phenomenal job! Let me say the the set was outstanding. Rolling scenery wagons allowed whole portions of the walls to rotate in order to "create" the additional rooms of the mansion. The play was adapted from the movie script, which was created by writing a farsical story based on the Parker Brothers game. The rooms are the ones you know from the game board. The play is totally hilarious. I haven't laughed so much in a long time.

Here, the butler welcomes Colonel Mustard to the house. scene from play Clue

Each of the guests- you know them- Colonel Mustard, Mr. Green, Professor Plum, Miss Scarlett, Mrs. Peacock, and Mrs. White, receives his or her weapon as a mystery gift from Mr. Boddy. The wrench, the revolver, the lead pipe, the candlestick, the knife and the rope... but you knew that already. scene from play Clue

Soon, the cook is found dead in the kitchen, killed with the knife. You know how it goes... you have two of the three elements, but who did it? Actually, the dead cook almost manages to take out Mr. Green! scene from play Clue

Next, Mr. Boddy becomes a body. I included this picture so you could see the French maid, far left. scene from play Clue

The middle portion of the play is the hilarious pursuit of trying to determine who killed whom, and who else might turn up dead. Here, Col. Mustard and Miss Scarlett find the secret passageway from the Conservatory. scene from play Clue

All is revealed at the end (of course, right?) Mrs. White makes an accusation. scene from play Clue

All the main characters and several of the minor ones were outstanding. It was a high-energy production. I'd like to say the butler in particular was great, but so were Mrs. White, Mrs. Peacock, Miss Scarlett, Col Mustard, Mr. Green and Prof. Plum. Each was just what they were supposed to be and played the roles to perfection.

In other news: I wrote two articles this morning. In the afternoon I worked on trailer stuff in the house (because the weather was kind of miserable), and hike food, and went to the store. I had a meeting this evening. Finally... I get to cross something off. 2 big things-the articles. So there are now 33 BIG ITEMS to do (29 done) and 25 small ones (11 done) to do. 36 days to go.

See Ossawald Crumb

Sunday, October 24, 2021

Dragon Trail Beginnings

  Nice hike today with Monica and her daughter Keira. friends

The last time I went to Hardy Dam was because the 46-mile "Dragon Trail" was in the planning stages. Now there are actually some miles completed. Dragon Trail sign

There are 14.6 miles, but they are not contiguous. So we did most of what is complete, and one little piece of that as an out-and-back. We did get a nice early start from my house, but it's over an hour away. Nevertheless it was still a lovely morning at the boat launch as we were getting ready to hike. HArdy Dam pond

The trail is designed for mountain bike and hiking use. That means there are lots more twists and turns and small hills than you'd usually find on a hiking trail. twisting mountain bike trail

Most of the day was cloudy, but occasionally the sun popped out giving some good autumn color. You can see the water most of the time from the trail. HArdy Dam pond

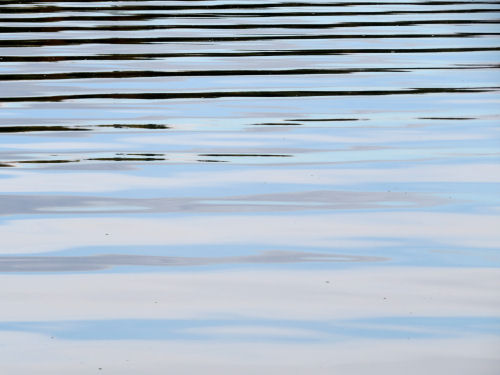
You know I love patterns. This was the best one on the water today. patterns in water

We started from a park called Big Bend and walked toward the dam. We knew we were getting close here, but actually had over a mile to go because the trail wandered around an arm of water. HArdy Dam

One more view with some nice color. HArdy Dam pond

And at the end we walked across the dam and back. This is the view downstream on the Muskegon River. Muskegon River south of HArdy Dam

We did 13.2 miles, and I can feel it, but I could easily have walked 2 or 3 more. This is really good. The weather was ideal. We think it was 39 degrees when we started, but most of the time it was high 40s or into the 50s. Lots and lots of cyclists. A moderate number of hikers.

Dragon Trail from Big Bend Park to Consumer's Beach Park and back to parking. 13.2 miles

There is no other news.

See Hardy Dam